Detecting the handwritten digit in Python
 By Nikita Pande
In this tutorial, you will create a neural network model that can detect the handwritten digit from an image in Python using sklearn. A neural network consists of three types of layers named the Input layer that accepts the inputs, the Hidden layer that consists of neurons that learn through training, and an Output layer which provides the final output.
Detection of handwritten digit from an image in Python using scikit-learn
To get started with this first we need to download the dataset for training. The dataset is the MNIST digit recognizer dataset which can be downloaded from the kaggle website.
The dataset consists of two CSV (comma separated) files namely train and test. The model is trained on the train.csv file and then tested using a test.csv file.
Dealing with the training dataset
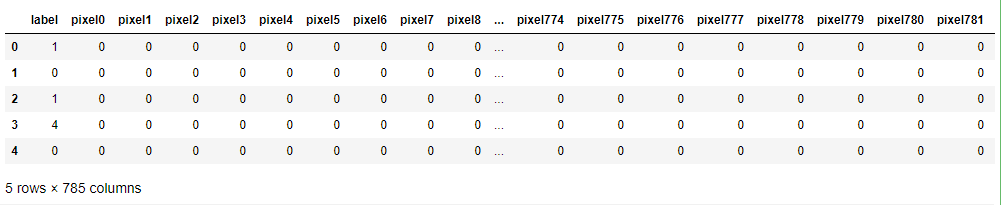
The train.csv file consists of 785 columns out of which one column defines the label of the digit and the rest are the pixels of the image.
- First, we import the required libraries
import pandas as pd
import numpy as np
- Then we load the dataset
dataset=pd.read_csv('train.csv') - We view the first few rows of the dataset as
dataset.head()
The dataset looks like:
- Dividing the dataset into two numpy arrays x and y such that x contains all pixel values and y contains the label column.
x=dataset.iloc[:,1:785].values
y=dataset.iloc[:,0].values
- Splitting the training dataset into 2 parts train and test, train for training the model and test for validating the model.
from sklearn.model_selection import train_test_split
x_train,x_test,y_train,y_test=train_test_split(x,y,test_size=0.2,random_state=0)
Assigning the respective labels. Here, we consider 80% of the training dataset as a train and the remaining 20% as validating dataset.
- Reshaping the x_train as each image is of size 28X28 and in all x_train consists of 33600 rows.
x_train=x_train.reshape(33600,28,28,1)
- Converting y_train into categorical values
from keras.utils import to_categorical
y_train=to_categorical(y_train)
- Creating the convolutional neural networks
- Importing all the required libraries and packages
from keras.models import Sequential
from keras.layers import Convolution2D
from keras.layers import MaxPooling2D
from keras.layers import AveragePooling2D
from keras.layers import Flatten
from keras.layers import Dense
from keras.layers import Dropout
from keras.models import load_model
- Classifier
classifier=Sequential()
- Defining the input layers
classifier.add(Convolution2D(32,(3,3),input_shape=(28,28,1),activation='relu'))
classifier.add(MaxPooling2D(pool_size=(2,2)))
classifier.add(Flatten())
classifier.add(Dense(units=128,activation='relu'))
classifier.add(Dropout(0.2))
- Creating the output layer
classifier.add(Dense(10, activation='softmax'))
Here, we use activation function as ‘softmax’ because the output is categorical.
- Compiling the model
classifier.compile(optimizer='adam',loss='categorical_crossentropy',metrics=['accuracy'])
- Fitting the model on train and test sets
classifier.fit(x_train,y_train,epochs=35,batch_size=500,validation_split=0.2)
- Saving the model
classifier.save('digit_recognizer.h5')
- Importing all the required libraries and packages
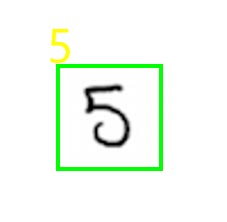
- Testing the model on an image
import numpy as np,cv2,imutils
#reading image
img = cv2.imread(#image-name)
#resizing image
img = imutils.resize(img,width=300)
#showing original image
cv2.imshow("Original",img)
#converting image to grayscale
gray = cv2.cvtColor(img,cv2.COLOR_BGR2GRAY)
#showing grayscale image
cv2.imshow("Gray Image",gray)

#creating a kernel
kernel = np.ones((40,40),np.uint8)

#applying blackhat thresholding
blackhat = cv2.morphologyEx(gray,cv2.MORPH_BLACKHAT,kernel)


#applying OTSU's thresholding
ret,thresh = cv2.threshold(blackhat,0,255,cv2.THRESH_BINARY+cv2.THRESH_OTSU)

#performing erosion and dilation
opening = cv2.morphologyEx(thresh, cv2.MORPH_OPEN, kernel)

#finding countours in image
ret,cnts= cv2.findContours(thresh.copy(),cv2.RETR_EXTERNAL,cv2.CHAIN_APPROX_SIMPLE)

#loading our ANN model
classifier = load_model('digit_recognizer.h5')
for c in cnts:
    try:
        #creating a mask
        mask = np.zeros(gray.shape,dtype="uint8")


        (x,y,w,h) = cv2.boundingRect(c)

        hull = cv2.convexHull(c)
        cv2.drawContours(mask,[hull],-1,255,-1)
        mask = cv2.bitwise_and(thresh,thresh,mask=mask)


        #Getting Region of interest
        roi = mask[y-7:y+h+7,x-7:x+w+7]
        roi = cv2.resize(roi,(28,28))
        roi = np.array(roi)
        #reshaping roi to feed image to our model
        roi = roi.reshape(1,784)

        #predicting
        prediction = model.predict(roi)
        predict=prediction.argmax()

        cv2.rectangle(img,(x,y),(x+w,y+h),(0,255,0),1)
        cv2.putText(img,str(int(predict)),(x,y),cv2.FONT_HERSHEY_SIMPLEX,0.8,(255,255,0),1)

    except Exception as e:
        print(e)

img = imutils.resize(img,width=500)

#showing the output
cv2.imshow('Detection',img)
Output
Also read:
Leave a Reply