KeyBoard Input Using Gestures in Python (Deep Learning)
 By Tushar Goel
In this article, you will learn about how to take keyboard inputs using Gestures through CNNs and PyAutoGUI ( Python Automation Library). In today’s era of Automation, we want such systems that can lower the efforts of Humans and which can be beneficial to society. By using this program, it will beneficial to all those people who are illiterate, not able to read and type through PCs.
We will cover this article in two parts:
- Training a Model to classify Gestures into various alphabets and numbers.
- Using the trained model, Automated the keyboard inputs.
Before going further, You are advised to download Sign-Language-Alphabet and Sign-Language-Numbers and I have combined these two datasets which can be accessed here: Hand-Gestures-Dataset and notebook.zip folder which will be followed in this article. This notebook folder also contains the model file which can be directly used for step 2.
Requirements:
- OpenCV
- PyAutoGUI
- Tensorflow
- Keras
Train a Model to Classify Hand Gestures
We will Train our model in two parts:
- By creating a Number gesture classifier.
- By creating an Alphabet gesture classifier.
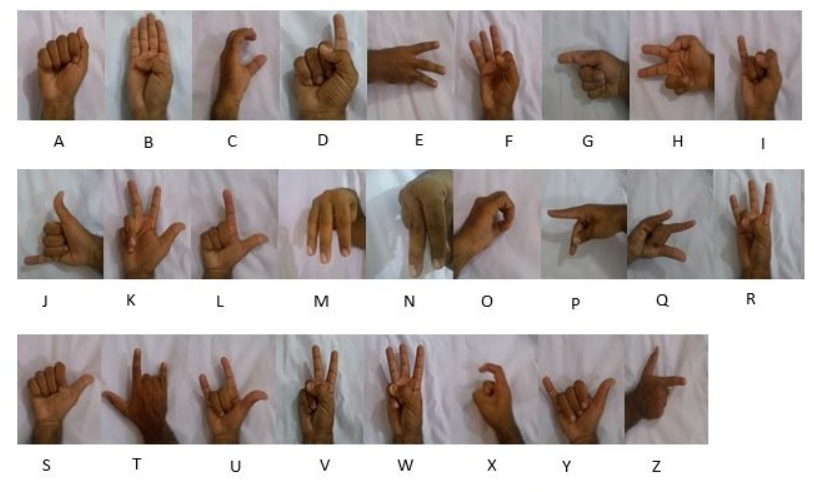
Alphabet Gestures :
Number Gestures :

Number Gesture Classifier: After Downloading dataset and Notebook, put them into a folder and the notebooks provided are created on Kaggle Kernels, so you are advised to change the relative paths.
Now first, we are going to import essential Libraries:
#Importing Different Libraries
import pandas as pd
import numpy as np
import matplotlib.pyplot as plt
import matplotlib.image as mpimg
import keras
import tensorflow as tf
from keras.models import Sequential
from keras.layers import Flatten,Dropout,Dense
from keras.layers import Conv2D,MaxPooling2D
from PIL import Image
Now we will preprocess our Training Data by resizing the images and Converting their mode from RGB to GrayScale.
# Creating list for  all Sign
# Then it can be converted into Train and Test
import os
import cv2
img_dir_no = 0
x,y = [],[]
directories = os.listdir('/kaggle/input/sign-language-for-numbers/Sign Language for Numbers')
for i in range(11):

            image_path = os.path.join('/kaggle/input/sign-language-for-numbers/Sign Language for Numbers','{}'.format(directories[img_dir_no]))

            for j in range(len(os.listdir(image_path))):
                image_file_name = os.path.join(image_path,os.listdir(image_path)[j])
                img = cv2.imread(image_file_name,0)
                img_x = cv2.resize(img,(64,64))
                img_x = img_x/255.0
                img_x = img_x.reshape((64,64,1))

                x.append(img_x)
                y.append(sign_language_label_number.get(directories[img_dir_no]))


            img_dir_no = img_dir_no+1
In the above code, we have used cv2 (Computer Vision) Library and os library for Iterating over each image in the dataset and modifying them.
Line 14-17: We read the images using cv2.imread() and then resize it to (64,64). Then Normalise the pixels between 0 and 1 by dividing each pixel by the maximum pixel value i.e. 255. Then it gets appended into list x and corresponding label into y.
Now, We will transform our list into arrays and y list into categorical value one-hot encoding.
from keras.utils import to_categorical
x = np.array(x)
y = np.array(y)
y = to_categorical(y)
print(x.shape)
print(y.shape)
num_classes = y.shape[1]
Output:
(16500,64,64,1)(16500,12)
We will split our data into Training and Test data using sklearn.model_selection library with test size of 10% of Total dataset.
from sklearn.model_selection import train_test_split
x_train,x_test,y_train,y_test = train_test_split(x,y,test_size=0.1)
Now, It’s time to define our network:
def hand_sign_classifier():
    model = Sequential()
    model.add(Conv2D(16, (2,2), input_shape=x_train.shape[1:], activation='relu'))
    model.add(MaxPooling2D(pool_size=(2, 2), strides=(2, 2), padding='same'))
    model.add(Conv2D(32, (3,3), activation='relu'))
    model.add(MaxPooling2D(pool_size=(3, 3), strides=(3, 3), padding='same'))
    model.add(Conv2D(64, (5,5), activation='relu'))
    model.add(MaxPooling2D(pool_size=(5, 5), strides=(5, 5), padding='same'))
    model.add(Flatten())
    model.add(Dense(128, activation='relu'))
    model.add(Dropout(0.2))
    model.add(Dense(11, activation='softmax'))
    model.add(Dense(num_classes, activation = 'softmax'))
    return model


model = hand_sign_classifier()
Now we compile our model and fit our Training data with epochs=10 and lets us see the Output…
model.compile(optimizer='adam', metrics=['accuracy'], loss='categorical_crossentropy')
model.fit(x_train, y_train, batch_size=32, epochs=10, validation_data=[x_test, y_test])
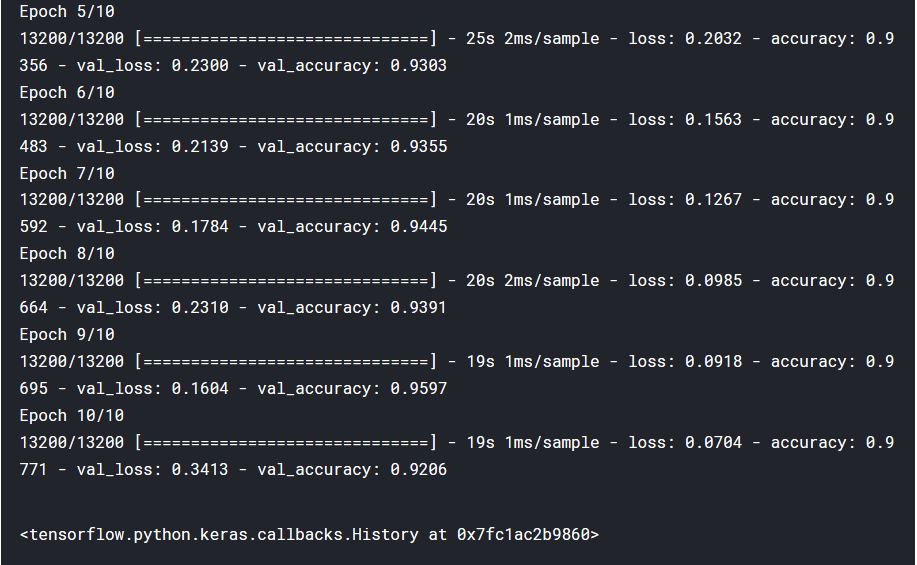
We will then save the model by ‘model_number.h5′ as provided in the above dataset folder.
In the same fashion, we will Train our model for Alphabet classifier and save model as ‘model_alphabet.h5′ as provided in the above folders.
Automate the Keyboard
Before further going, you should install pyautogui using
pip install PyAutoGUI
Now, we will import the Keras library for loading our model and PyAutoGUI
from tensorflow.keras.models import load_model
import pyautogui

model_alphabet = load_model(r'\Keyboard input from gesture\model_alphabet.h5')
model_number = load_model(r'\Keyboard input from gesture\model_number.h5')
we are going to input our gestures using our own webcam, and Typewriting through it:
import cv2
import time
cap = cv2.VideoCapture(0)
while True:
    _,frame = cap.read()
    cv2.rectangle(frame,(50,100),(200,400),(0,255,255),1)
    cv2.rectangle(frame,(477,100),(677,400),(0,255,255),1)
    cv2.putText(frame,'Alpha',(50,100),cv2.FONT_HERSHEY_SIMPLEX,1,(255,0,0))
    cv2.putText(frame,'Number',(377,100),cv2.FONT_HERSHEY_SIMPLEX,1,(255,0,0))
    roi_alpha = frame[100:400,50:200]
    roi_num = frame[100:400,477:677]

    img_alpha = cv2.resize(roi_alpha,(64,64),interpolation=cv2.INTER_CUBIC)
    img_alpha = cv2.cvtColor(img_alpha,cv2.COLOR_BGR2GRAY)
    img_alpha = img_alpha/255.0

    img_num = cv2.resize(roi_num,(64,64),interpolation=cv2.INTER_CUBIC)
    img_num = cv2.cvtColor(img_num,cv2.COLOR_BGR2GRAY)
    img_num = img_num/255.0
    predict_alpha = model_alphabet.predict_classes(img_alpha.reshape((1,64,64,1)))
    predict_num = model_number.predict_classes(img_num.reshape((1,64,64,1)))
    word = [key  for (key, value) in Alphabet_Dictionary.items() if value == predict_alpha[0]][0]
    num = [key  for (key, value) in Number_Dictionary.items() if value == predict_num[0]][0]
    if predict_alpha[0]==26 and predict_num[0]==10:
        pyautogui.press('space')
        pass
    elif predict_alpha[0]==26 and predict_num[0]!=10:
        pyautogui.typewrite(num)
        print('typing:',num)
    elif predict_num[0]==10 and predict_alpha[0]!=26:
        pyautogui.typewrite(word)
        print('typing:',word)
    else:
        pyautogui.typewrite(word)
        pyautogui.typewrite(num)
        print('typing :',word)
        print('typing :',num)
    cv2.imshow('frame',frame)
    cv2.imshow('roi_apha',roi_alpha)
    cv2.imshow('roi_num',roi_num)
    if cv2.waitKey(1) & 0xFF==ord('q'):

        break
    time.sleep(1)
cap.release()
cv2.destroyAllWindows()
Now we are going to Understand it Line-by-Line:
Line 1-3: We have Import cv2 library and using its feature (VideoCapture(0)) we start capturing our Webcam.
Line 6-9: We are going to make two rectangular sections: one for detecting alphabets and another one for detecting Numbers as shown below

Line 13-21: preprocess the gesture we get in rectangular sections that are suitable for the model and predict the class of the gesture captured.
Line 22-23: You will see in our Notebook, there is a cell above this cell that has a dictionary of keys and values related to predicted classes and their Label. Through this code, we are going to predict the label whether it is 1,2,3 or a,b,c.
Line 24-37: we pass the arguments, that if no gesture is there in both rectangular boxes then, it will provide space by using pyautogui.press() command and write through pyautogui.typewrite() command.
For further functionality and Documentation of PyAutoGUI, click here
Line 38-40: We are to going to open the window for your webcam.
Line 41-43: If you press ‘q’, It will end up the process.
And Just Imagine What happened !!! You have just created an Automation program that can type according to your hand gestures.
If you face any problems or to provide suggestions, You are most welcome. Comment it Down…
Reading de code, we can see some errors. sign_language_label_number not declared is one. Directories too.
Sorry, you have to check your code.