Geometric transformations of Image in Python
 By Aditi Deo
Geometric transformations of images are used to transform the image by changing its size, position or orientation. It has many applications in the fields of Machine Learning and Image Processing.
For instance, consider a Machine Learning based project of detecting emotions such as anger, sadness, happy from a given set of images. The database consists of images present at different scales and orientations. But the model needs a uniform set of images. Therefore, it is necessary to apply geometric transformations to images to transform them into a consistent format. Thus, in this tutorial, we will understand how to apply geometric transformations to an image using Pillow Library in Python.
We are going to understand three basic geometric transformations of an image:
- Rotation
- Scaling
- Translation.
Along with this, we will also learn how to combine these transformations together to perform composite transformations of the image.
Importing Library and Reading Image
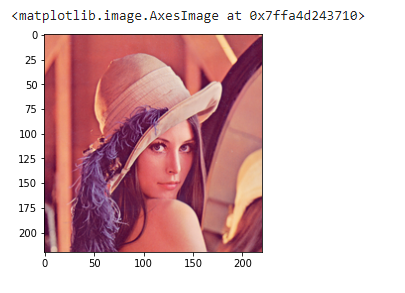
In the first step, we are going to import Pillow and read the image. Pillow is a Python-based library that provides basic tools for opening, saving, and manipulating images. We import the matplotlib.pyplot library to plot the images in Python. We use the open() function to read the image from the location specified as a parameter to the function.
from PIL import Image
import matplotlib.pyplot as plt
image = Image.open(r"lenna.png")
plt.imshow(image)
Output:
Getting the size and mode of Image
The properties of the above-created image object such as size and mode are used to get the size and color model of the given image. We get the size in terms of width and height. The color model, in this case, is RGB. RGB stands for red, green, and blue channels of the given image.
size=image.size
mode=image.mode
print(f"The size of Image is: {size}")
print(f"The mode of Image is: {mode}")
Output:
The size of Image is: (220, 220)
The mode of Image is: RGB
Rotation of Image
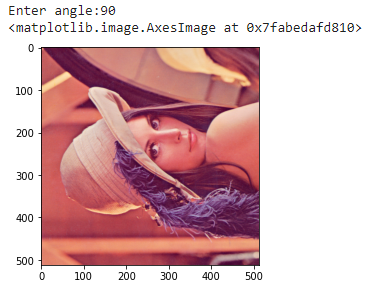
For rotating an image, we are initially taking angle as a user input to determine the angle with which the image should be rotated. Then we use the rotate() function to rotate the image by the specified angle in degrees in a clockwise approach. We then plot the rotated image as an output. In the below-mentioned code, we have rotated the image by 90 degrees.
angle=int(input("Enter angle:"))
image = image.rotate(angle)
plt.imshow(image)
Output:
Scaling of Image
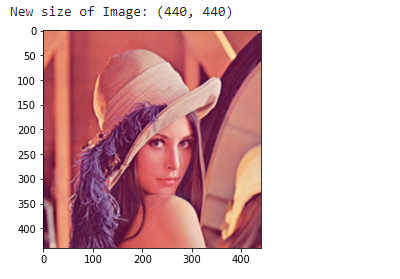
For scaling an image, we try to increase or decrease the size of the image. To scale an image we make use of resize() function in Python. The resize function takes a tuple containing the width and height of the image as parameters. The image is then resized to this newly mentioned width and height. In the below-mentioned code, we have doubled the width and height of the image.
(width,height)=(image.width*2,image.height*2)
img_resize = image.resize((width,height))
plt.imshow(img_resize)
print(f"New size of image: {img_resize.size}")
Output:
Translation of Image
Image translation is changing the position of an image by a specified shift in x and y directions. To translate an image we make use of the transform() function in Python. The syntax of the transform function is mentioned below.
image_object.transform(size, method, data)
where size=size of the output image
method= method of transformation of the image
data=data given as an input to the transformation method
In the below-mentioned code, the method used for transformation is AFFINE. Affine Transformation is used to transform the image while preserving parallel lines in input and output images. The input data to the affine method is a six-element tuple (a,b,c,d,e,f) which represents an affine transformation matrix. Initially, we take the values x and y as input which represents the x and y-axis shifts respectively. The method will calculate the value as (ax+by+c, dx+ey+f) for every (x,y) value given as input to the c and f variables.
x=int(input("Enter pixels for x axis shift:"))
y=int(input("Enter pixels for y axis shift:"))
a = 1
b = 0
c = x
d = 0
e = 1
f = y
image = image.transform(image.size, Image.AFFINE, (a, b, c, d, e, f))
plt.imshow(image)
Output:

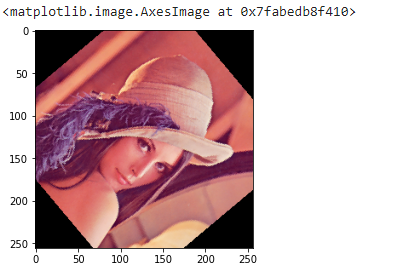
Composite Transformation of Image
We can apply multiple geometric transformations to perform the composite transformations of the image. In the below-mentioned code, we have combined the scaling and rotation of the image. We initially double the width and height and image. Then, we rotate the image by 50 degrees anticlockwise. To rotate any image anticlockwise we specify a negative sign before the angle.
(width,height)=(round(im.width/2),round(im.height/2))
img_resize = im.resize((width,height))
im1=img_resize.rotate(-50)
plt.imshow(im1)
Output:
This is the end of the tutorial on how to apply geometric transformations to Images in Python. To read further about the Pillow library in Python refer to the following link: Get the Basic image information with Pillow | Python
Leave a Reply