Face Recognition from video in python using OpenCV
 By Aparna Srivastava
In the present era, OpenCV becomes a very strong tool for machine learning with the help of computer vision this become easier. In this tutorial, we will learn Face Recognition from video in Python using OpenCV.
So How can we Recognize the face from video in Python using OpenCV we will learn in this Tutorial.
Now let’s begin
We will divide this tutorial into 4 parts. So you can easily understand this step by step.
- We detect the face in any Image.
- We detect the face in image with a person’s name tag.
- Detect the face in Live video.
- Detect the face from the video.
1. We detect the face in any Image
In this part, we learn how to search the face in the whole image. You can use any IDE of python but OpenCV must install
in your system. There is also a need for Haar Cascade this must be downloaded.
Now the question is arises that what is Haar Cascade? and why we need to download this ? and How to use this in our code?
what is Haar Cascade? A haar cascade is an XML file that we use to detect a particular object from the given source (Here the source in images).
Need of Haar Cascade? we need Haar cascade to detect the face in the given images.
How to use this in our code? we can download this from the link which is given below after downloading we paste this path (where it is saved) in the cv2.CascadeClassifier(“here we paste the path”)
Download Link: haar cascade download
Here we use PyCharm IDE in this coding.
We are creating two files:-
A). faceRecognization_OpenCV.py
B). Test_img.py
A). faceRecognization_OpenCV.py:-
import cv2
import os
import numpy as np
def facee_recognization(test_img):
    grayImg = cv2.cvtColor(test_img,cv2.COLOR_BGR2GRAY)
    face_haar_cascade = cv2.CascadeClassifier("/home/aparna/PycharmProjects/FaceDetection_OpenCV/cascads/haarcascade_frontalface_alt.xml")
    face = face_haar_cascade.detectMultiScale(grayImg,scaleFactor=1.40,minNeighbors=5)
    return face,grayImg
B). Test_img.py:-
import cv2
import os
import numpy as np
import faceRecognization_OpenCV as fcv
test_img = cv2.imread("/home/aparna/PycharmProjects/FaceDetection_OpenCV/lena.jpg") (# it is the location of your image)
face_detect,grayImg = fcv.facee_recognization(test_img)
print("face Detected : ", face_detect)
for (x,y,w,h) in face_detect:
    cv2.rectangle(test_img,(x,y),(x+w,y+h),(255,255,255), thickness=2)
resize = cv2.resize(test_img,(500,500))
cv2.imshow("Face Detection Tutorial :", resize)
cv2.waitKey(0)
cv2.destroyAllWindows()
Input :

Output:

2. We detect the face in image with person
Now next step is detecting the face with the name person’s name tag. The code is given below.
A). faceRecognization_OpenCV.py:-
import cv2
import os
import numpy as np

def face_recognition(test_img):
    grayImg = cv2.cvtColor(test_img, cv2.COLOR_BGR2GRAY)
    face_haar_cascade = cv2.CascadeClassifier(
        "/home/aparna/PycharmProjects/FaceDetection_OpenCV/cascads/haarcascade_frontalface_alt.xml")
    faces = face_haar_cascade.detectMultiScale(grayImg, scaleFactor=1.40, minNeighbors=5)
    return faces, grayImg
def labels(directory):
    faces=[]
    facesId=[]
    for path,subdirnames,filenames in os.walk(directory):
        for filename in filenames:
            if filename.startswith("."):
                print("skip this")
                continue
            id=os.path.basename(path)
            image_path=os.path.join(path,filename)
            print("image_path", image_path)
            print("id: ", id)
            test_img=cv2.imread(image_path)
            if test_img is None:
                print("image is not load in proper way!")
                continue
            face_rect,gray_img=face_recognition(test_img)
            if len(face_rect)!=1:
                continue
            (x,y,w,h)=face_rect[0]
            roi_gray=gray_img[y:y+w,x:x+h]
            faces.append(roi_gray)
            facesId.append(int(id))
    return faces,facesId
def training(faces,facesId):
    face_recognizer = cv2.face.LBPHFaceRecognizer_create()
    face_recognizer.train(faces,np.array(facesId))
    return face_recognizer
def rectangle(test_img,face):
    (x,y,w,h)=face
    cv2.rectangle(test_img,(x,y),(x+w,y+h),(255,255,255),thickness=2)
def Text(test_img,text,x,y):
    cv2.putText(test_img,text,(x,y),cv2.FONT_HERSHEY_SIMPLEX,1,(255,255,255),1)
B). Test_img.py:-
import cv2
import os
import numpy as np
import faceRecognization_OpenCV as fcv
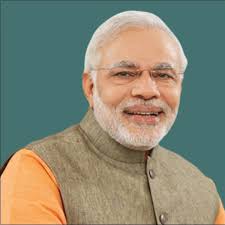
test_img=cv2.imread("/home/aparna/PycharmProjects/FaceDetection_OpenCV/test_img/1_modi/modi.jpeg")
faces_detected,gray_img = fcv.face_recognition(test_img)
face_recognizer=cv2.face.LBPHFaceRecognizer_create()
face_recognizer.read("/home/aparna/PycharmProjects/FaceDetection_OpenCV/training_data.yml")
name ={0:"Amit Shah",1:"narendra modi",2:"smriti irani"}
for faces in faces_detected:
(x,y,w,h) = faces
roi_gray=gray_img[y:y+h, x:x+h]
lable,confidence=face_recognizer.predict(roi_gray)
print("confidence: ", confidence)
print("lable: ", lable)
fcv.rectangle(test_img,faces)
predicted_name=name[lable]
if (confidence>100):
continue
fcv.Text(test_img,predicted_name,x,y)
resized_img=cv2.resize(test_img,(700,600))
cv2.imshow("Face Detection tutorial: ", resized_img)
cv2.waitKey(0)
cv2.destroyAllWindows()
Input:- 1)

Output:- 1)
 Input:- 2)
 Output:- 2)

3. Detect the face in Live video
In this section, we learn how to detect face in Live video.
A). faceRecognization_OpenCV.py:–
import cv2
import os
import numpy as np


def face_recognition(test_img):
    grayImg = cv2.cvtColor(test_img, cv2.COLOR_BGR2GRAY)
    face_haar_cascade = cv2.CascadeClassifier(
        "/home/aparna/PycharmProjects/FaceDetection_OpenCV/cascads/haarcascade_frontalface_alt.xml")
    faces = face_haar_cascade.detectMultiScale(grayImg, scaleFactor=1.40, minNeighbors=5)
    return faces, grayImg
def labels(directory):
    faces=[]
    facesId=[]
    for path,subdirnames,filenames in os.walk(directory):
        for filename in filenames:
            if filename.startswith("."):
                print("skip this")
                continue
            id=os.path.basename(path)
            image_path=os.path.join(path,filename)
            print("image_path", image_path)
            print("id: ", id)
            test_img=cv2.imread(image_path)
            if test_img is None:
                print("image is not load in proper way!")
                continue
            face_rect,gray_img=face_recognition(test_img)
            if len(face_rect)!=1:
                continue
            (x,y,w,h)=face_rect[0]
            roi_gray=gray_img[y:y+w,x:x+h]
            faces.append(roi_gray)
            facesId.append(int(id))
    return faces,facesId
def training(faces,facesId):
    face_recognizer = cv2.face.LBPHFaceRecognizer_create()
    face_recognizer.train(faces,np.array(facesId))
    return face_recognizer
def rectangle(test_img,face):
    (x,y,w,h)=face
    cv2.rectangle(test_img,(x,y),(x+w,y+h),(255,255,255),thickness=2)
def Text(test_img,text,x,y):
    cv2.putText(test_img,text,(x,y),cv2.FONT_HERSHEY_SIMPLEX,1,(255,255,255),1)
B). Test_img.py:-
import cv2
import os
import numpy as np
import faceRecognization_OpenCV as fcv

face_recognizer = cv2.face.LBPHFaceRecognizer_create()
face_recognizer.read("/home/aparna/PycharmProjects/FaceDetection_OpenCV/training_data.yml")
name = {0:"Amit Shah",1:"narendra modi",2:"smriti irani"}
cap = cv2.VideoCapture(0)
while True:
    ret, test_img=cap.read()
    faces_detected, gray_Img = fcv.face_recognition(test_img)
    for (x,y,w,h) in faces_detected:
        cv2.rectangle(test_img,(x,y),(x+w,y+h),(255,255,255), thickness=4)
    resize_img = cv2.resize(test_img,(500,500))
    cv2.imshow("Face Detection Tutorial: ", resize_img)
    cv2.waitKey(10)
    for faces in faces_detected:
        (x,y,w,h) = faces
        roi_gray = gray_Img[y:y+w, x:x+h]
        lable, confidence = face_recognizer.predict(roi_gray)
        print("Confidence: ", confidence)
        print("lable: ", lable)
        fcv.rectangle(test_img, faces)
        predicted_name = name[lable]
        if confidence<150:
            fcv.Text(test_img,predicted_name,x,y)
    resize_img = cv2.resize(test_img,(500,500))
    cv2.imshow("Face recognition Tutorial: ", resize_img)
    if cv2.waitKey(10)==ord('q'):
        break
cap.release()
cv2.destroyAllWindows()
4. Detect the face from the video
In this section, we learn how we recognize a face in the video.
A). faceRecognization_OpenCV.py:-
import cv2
import os
import numpy as np


def face_recognition(test_img):
    grayImg = cv2.cvtColor(test_img, cv2.COLOR_BGR2GRAY)
    face_haar_cascade = cv2.CascadeClassifier(
        "/home/aparna/PycharmProjects/FaceDetection_OpenCV/cascads/haarcascade_frontalface_alt.xml")
    faces = face_haar_cascade.detectMultiScale(grayImg, scaleFactor=1.40, minNeighbors=5)
    return faces, grayImg
def labels(directory):
    faces=[]
    facesId=[]
    for path,subdirnames,filenames in os.walk(directory):
        for filename in filenames:
            if filename.startswith("."):
                print("skip this")
                continue
            id=os.path.basename(path)
            image_path=os.path.join(path,filename)
            print("image_path", image_path)
            print("id: ", id)
            test_img=cv2.imread(image_path)
            if test_img is None:
                print("image is not load in proper way!")
                continue
            face_rect,gray_img=face_recognition(test_img)
            if len(face_rect)!=1:
                continue
            (x,y,w,h)=face_rect[0]
            roi_gray=gray_img[y:y+w,x:x+h]
            faces.append(roi_gray)
            facesId.append(int(id))
    return faces,facesId
def training(faces,facesId):
    face_recognizer = cv2.face.LBPHFaceRecognizer_create()
    face_recognizer.train(faces,np.array(facesId))
    return face_recognizer
def rectangle(test_img,face):
    (x,y,w,h)=face
    cv2.rectangle(test_img,(x,y),(x+w,y+h),(255,255,255),thickness=2)
def Text(test_img,text,x,y):
    cv2.putText(test_img,text,(x,y),cv2.FONT_HERSHEY_SIMPLEX,1,(255,255,255),1)
B). Test_img.py:-
import cv2
import os
import numpy as np
import faceRecognization_OpenCV as fcv

face_recognizer = cv2.face.LBPHFaceRecognizer_create()
face_recognizer.read("/home/aparna/PycharmProjects/FaceDetection_OpenCV/training_data.yml")
name = {0:"Amit Shah",1:"narendra modi",2:"smriti irani"}
cap = cv2.VideoCapture("/home/aparna/PycharmProjects/FaceDetection_OpenCV/sample_video/smriti.mp4")
while True:
    ret, test_img=cap.read()
    faces_detected, gray_Img = fcv.face_recognition(test_img)
    for (x,y,w,h) in faces_detected:
        cv2.rectangle(test_img,(x,y),(x+w,y+h),(255,255,255), thickness=4)
    resize_img = cv2.resize(test_img,(500,500))
    cv2.imshow("Face Detection Tutorial: ", resize_img)
    cv2.waitKey(10)
    for faces in faces_detected:
        (x,y,w,h) = faces
        roi_gray = gray_Img[y:y+w, x:x+h]
        lable, confidence = face_recognizer.predict(roi_gray)
        print("Confidence: ", confidence)
        print("lable: ", lable)
        fcv.rectangle(test_img, faces)
        predicted_name = name[lable]
        if confidence<150:
            fcv.Text(test_img,predicted_name,x,y)
    resize_img = cv2.resize(test_img,(500,500))
    cv2.imshow("Face recognition Tutorial: ", resize_img)
    if cv2.waitKey(10)==ord('q'):
        break
cap.release()
cv2.destroyAllWindows()
Input Sample video:-
To download the video click here: video sample.mp4
for the training or testing of this code, you can make your data set or download from these links which are given below.
Note:- This predicts accurate correct results when your training data set contains 50,000 or more samples. So as possible make your data set large.
Sample training dataset download link:-
traning_img
Sample test dataset download link:-
test_img
OR
How to Prepare Your Own data set you can learn from here:-
Prepare your own data set
So this was the tutorial of Face Recognition from video in python using OpenCV. I hope this will be helpful for you.
Thank You.
HI,
PLEASE WHERE IS training_data.yml (or how to create it?)…
Thank you in advance,
Isaco
mam can you provide me a whole code please for live face recoginition