Cartooning of an Image in Machine Learning using Python
 By Akarsh Shekhar
In this tutorial program, we will learn about building Cartooning of an Image using machine learning with the language used is Python. So here I am going to discuss what are the basic steps of this machine learning problem and how to approach it.
This is done using a computer vision library that is openCV in Python.
Cartooning of an image requires adding an effect to the image. It is an approach which requires basic cv2 functions to be implemented The Process involves the following steps:
- Loading of the image and Specifying the parameters.
- Downscale or downsize the image and Convert it into a gray-scale.
- Blurring and masking of the image.
- convert back to colored form and Resize the image.
Python libraries to import:
OpenCV uses the library Cv2 which is used in many computer vision problems
import cv2
Loading of the image:
name = "image.png" #name of file// loading the images
results = teep_canvas.render(name)
Specifications of the image:
This is step involves specifying the images in with lower and upper bounds and triggering the image.
the ratio for the dimension of the image is also taken into account.
def generateRowRespond://The parametes
    ABC = (Respond[0].top_ask + Respond[0].top_bid) / 2
    DEF = (Respond[1].top_ask + Respond[1].top_bid) / 2
    ratio = priceABC / DEF
    upperBound = 1 + 0.05
    lowerBound = 1 - 0.05
    return
Downsample and conversion of the image:
To resize the image to applying operations on the images.
# downsample image
imageg_color = imageg_rgb
Imageg_resize = imageg_color
for i in range(noDownSamples):
    imageg_color = cv2.pyrDown(imageg_color)
The blurring of the image:
Next is getting a blurred image of the original image. We only want the blurring of the boundaries.
For this, we first convert the image to grayscale, and then we apply the blurring filter effect as seen below.
# blurring the image is an important step
imageg_gray = cv2.cvtColor(img_rgb, cv2.COLOR_RGB2GRAY)
# convert to grayscale and apply blur
imageg_blur = cv2.medianBlur(img_gray, 7)
imageg_blur2 = cv2.meanBlur(img_gray, 8)
imageg_blur3 = cv2.meanBlur(img_gray, 9)
imageg_blur4 = cv2.meanBlur(img_gray, 10)
def upsacle:
    for _ in iter(range(N)):
          iamges = json.loads(urllib.request.urlopen(QUERY.format(random.random())).read())


    for quote in quotes:
           image_gray = getDataPoint(quote)
Converting images back to colored form and masking:
After completing the image upscaling, and masking.
Also applying to resize before we apply the masking in the image is necessary.
The next step involves the image to be converted back from grayscale.
# Using image with mask-RCNN use the picture
# convert back to colored image
#resixe the image

imageg_edge = cv2.resize(imageg_edge, (a,b))

imageg_edge = cv2.lowerupperBound(blur, 255,
   cv2.MEAN,
   cv2.THRESH_BINARY,
   cv2.Bit
   Size=7,

# convert back to colored image using cvtColor
# Apply bitwise
ed = cv2.cvtColor(imgag_edge, cv2.COLOR_GRAY2RGB)
cartoon = cv2.bitwise_and(imgeg_color, imgeg_edge)
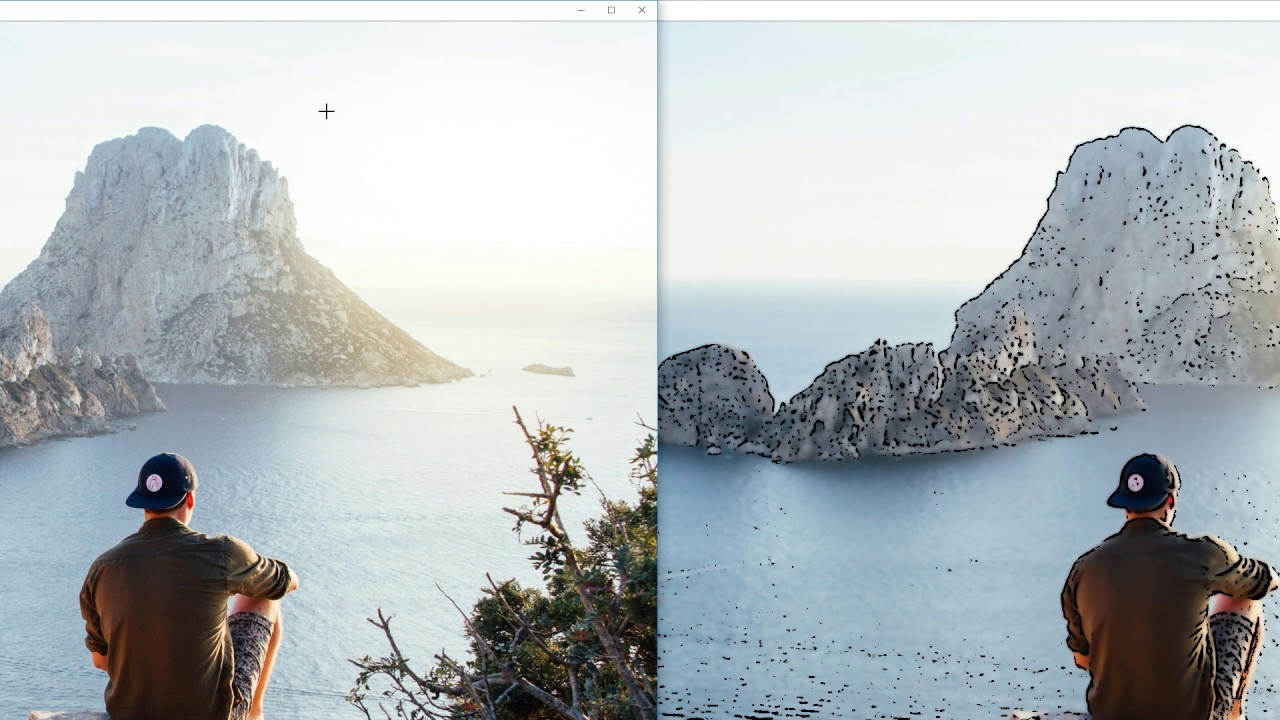
Final Image:
cv2.show("image.png")
The final image which is obtained is displayed below.
Both the original and cartooned image is displayed for a better understanding of the difference.
Also, read: COVID-19 Outbreak Prediction Using Machine Learning in Python
Leave a Reply