Wand text() function in Python with examples
 By Pratham Jain
In this tutorial, you will learn about the Wand text() function with examples. Earlier we have discussed wand function() function in python. Suppose, we now want to insert text in it. For this, we have a wand text() function in Python to do our job. This text() function is used to add text in the Drawing object. We just need to need to pass on the location of the text and the text inside the function. We can insert text on any image and also on a simple background color image as in our example. To read more about wand functions you can refer here.
About function
The general syntax for wand text() function in Python is,
wand.drawing.text(x, y, body)
here,
- x (numbers.Integral) – the left offset where to start writing a text
- y (numbers.Integral) – the baseline where to start writing text
- body (basestring) – the body string to write
About Program
Program explanation,
- import statements – firstly we import all necessary modules, packages for our program.
- with statements – with here is used to call Drawing() function and Image() function.
- draw object – used to draw our text on the image and make changes accordingly. Like, in my examples I set font size and also font family.
- text() function – used to set the location and text to draw on to the image.
- save() function – used to save our final image in our system.
To draw a simple color background image follow example-1. Inside the Image() function we need to pass the height, width, and background color of our image. This will automatically make one image for us on which we can do our text drawing.
To use any default image simply pass the path with the image name in filename attribute as in example-2.
Program Implementation
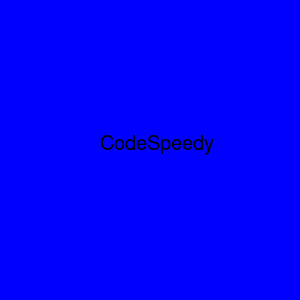
Example-1
Using a simple background color,
from wand.image import Image
from wand.drawing import Drawing
from wand.color import Color
import math

with Drawing() as draw:
  with Image(width = 300, height = 300, background = Color('blue')) as img:

    draw.font = 'Times New Roman'
    draw.font_size = 20
    draw.text(int(img.width / 3), int(img.height / 2), 'CodeSpeedy')
    draw(img)
    img.save(filename = "CodeSpeedy-1.png")
Output
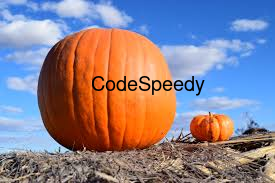
Example-2
Using any image,
from wand.image import Image
from wand.drawing import Drawing
from wand.color import Color
import math

with Drawing() as draw:
  with Image(filename = "pumpkin.jpeg") as img:
    draw.font = 'Times New Roman'
    draw.font_size = 20
    draw.text(int(img.width / 3), int(img.height / 2), 'CodeSpeedy')
    draw(img)
    img.save(filename = "CodeSpeedy-2.png")
Output-2
Leave a Reply