License Plate Recognition using OpenCV in Python
 By Gaurav Babbar
This tutorial will tell you the way to implement License Plate Recognition from car image in Python program using OpenCV and Pytesseract.
Let’s begin and implement it now step by step.
Follow the step with me to do this task.
Install required libraries for License Plate Recognition
Open cmd and install OpenCV and imutils using the following commands-
pip install opencv-contrib-python
OpenCV will be used here for various pre-processing techniques and for displaying the image.
pip install imutils
imutils library contains a series of basic pre-processing functions and here it will be used for resizing the image.
Now for installing pytesseract, head over to https://github.com/UB-Mannheim/tesseract/wiki and download and install it.
Use of pytesseract
The tesseract library is an optical character recognition (OCR) tool for Python. That is, it can recognize and read the text embedded from any image. So we’ll use it for identifying the characters inside the number plate.
For this tutorial, we will use the image you can see below:

Pre-processing of image
Now, look at our code given below:
import cv2
import imutils
import numpy as np
import pytesseract
from PIL import Image
pytesseract.pytesseract.tesseract_cmd = 'C:\\Program Files\\Tesseract-OCR\\tesseract.exe'
img = cv2.imread('4.jpg',cv2.IMREAD_COLOR)
img = imutils.resize(img, width=500 )
gray = cv2.cvtColor(img, cv2.COLOR_BGR2GRAY) #convert to grey scale
gray = cv2.bilateralFilter(gray, 11, 17, 17) #Blur to reduce noise
edged = cv2.Canny(gray, 30, 200) #Perform Edge detection
- Here, we first imported all the three libraries required by using the Python import keyword.
- Then the image is read and converted into gray-scale as less information will be stored for each pixel.
- After that, using OpenCV’s bilateralFilter fuunction, we reduce the noise in the image for a better edge detection.
- Finally, we use the Canny edge detection algorithm. It takes first argument as our input image, second and third arguments are our minVal and maxVal respectively which specify the threshold values.
This program will give the following output:

Finding and displaying Contours
Let us write our code first:
# find contours from the edged image and keep only the largest
# ones, and initialize our screen contour
cnts,new = cv2.findContours(edged.copy(), cv2.RETR_LIST, cv2.CHAIN_APPROX_SIMPLE)
img1=img.copy()
cv2.drawContours(img1,cnts,-1,(0,255,0),3)
cv2.imshow("img1",img1)
cv2.waitKey(0)
Now, let’s understand what are contours?
Contours are curves that help in identifying the regions in an image with the same intensity. Here, contours will help us in identifying the license plate of the car from the image. We are using two contours functions, cv2.findContours and cv2.drawContours.
cv.findContours() function takes three arguments-
- The first argument is the source image. Here we make a copy of the edged image as this function repeatedly finds contours in the image, meaning it makes the image unusable for future use. Also, the edged image makes identifying similar intensity curves easier.
- The second argument is the contour retrieval mode. Here the RETR_LIST type is used to retrieve all the detected contours in the image.
- The third parameter is the contour approximation method. CHAIN_APPROX_SIMPLE stores the end-points of the detected contours.
cv2.drawContours() function takes five arguments-
- The first argument is the image in which the detected contours will be drawn.
- The second argument is the variable that stores all the detected contours.
- Then, the third argument is contour indexes. Here we use the value -1 which will use the indexes of all the contours detected in our image. Hence all of the contours will be drawn on the image.
- After that, the fourth argument is the color in which contours will be drawn.
- The fifth argument is the thickness of the contour curve to be drawn.
This gives the following output-

Let’s continue coding:
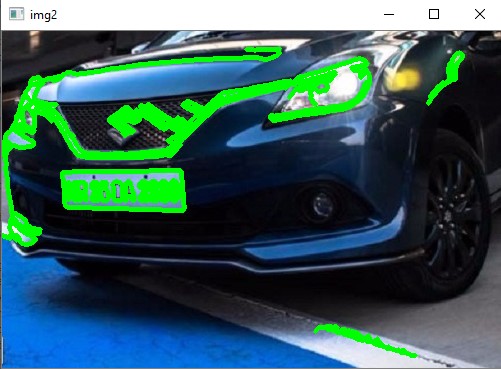
#sorts contours based on minimum area 30 and ignores the ones below that
cnts = sorted(cnts, key = cv2.contourArea, reverse = True)[:30]
screenCnt = None #will store the number plate contour
img2 = img.copy()
cv2.drawContours(img2,cnts,-1,(0,255,0),3)
cv2.imshow("img2",img2) #top 30 contours
cv2.waitKey(0)
count=0
Here, we select the top 30 contours according to the area in decreasing order as we don’t need the various small contours. This reduces the redundant and small contours that are not needed.
This gives the following output-
After that, see the code below:
idx=7
# loop over contours
for c in cnts:
  # approximate the contour
        peri = cv2.arcLength(c, True)
        approx = cv2.approxPolyDP(c, 0.018 * peri, True)
        if len(approx) == 4: #chooses contours with 4 corners
                screenCnt = approx
                x,y,w,h = cv2.boundingRect(c) #finds co-ordinates of the plate
                new_img=img[y:y+h,x:x+w]
                cv2.imwrite('./'+str(idx)+'.png',new_img) #stores the new image
                idx+=1
                break
- We loop over the selected 30 contours and then check one by one if the contour contains four corners as that would most likely be the number plate. Using peri function, we calculate perimeter of each contour.
- Then after finding coordinates of the plate using OpenCVs boundingRect function, we store the image with new dimensions in the variable new_img.
- Then using OpenCV’s function imwrite, we store the image in the directory.
Extracting text using Pytesseract
It’s time to extract the number or text from the plate:
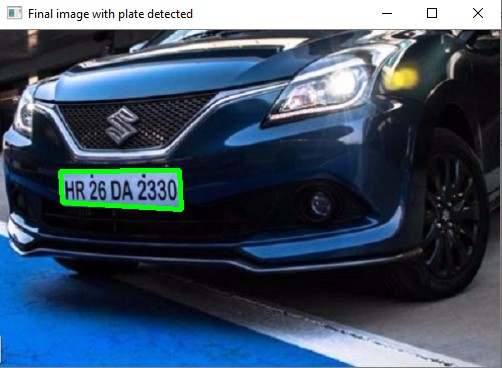
#draws the selected contour on original image
cv2.drawContours(img, [screenCnt], -1, (0, 255, 0), 3)
cv2.imshow("Final image with plate detected",img)
cv2.waitKey(0)
Cropped_loc='./7.png' #the filename of cropped image
cv2.imshow("cropped",cv2.imread(Cropped_loc))
text=pytesseract.image_to_string(Cropped_loc,lang='eng') #converts image characters to string
print("Number is:" ,text)
cv2.waitKey(0)
cv2.destroyAllWindows()
Here, we draw the selected contour on the original image which will be on the license plate as shown-
Then using pytesseract, we extract the characters from the image and print the text on the screen as you can see below:

Yea, we did it… License Plate Recognition in Python has been done successfully.
I hope you all liked the article!
Also, read:
A very good post.
you write: we did it’ but there is right unnecessary right bracket.
it because the pallet isn’t aligned. I subtract 1 pixel from the right and the bracket disappeared.
but I think that we must aligned the pallet in the program