Document Scanner using Python
 By Nikita Pande
In this tutorial, we will learn how to create a document scanner using python. This is a basic document scanner that can capture images of the documents and then can scan it or can also scan the uploaded images.
Creating a document scanner in Python
Requirements: To create a document scanner, we require python libraries like scikit-image, NumPy, OpenCV, imutils. We fulfill these requirements by installing specific libraries as follows:
To install these libraries run the following commands in anaconda prompt or command prompt-
- Scikit-image: pip install scikit-image
- NumPy- pip install numpy
- OpenCV- pip install opencv-python
- Imutils-pip install imutils
After installing the required libraries, we create a file named document_scanner.py
In document_scanner.py, write the following code:
Step 1: Import all the required libraries
from skimage. filters import threshold_local

import numpy as np

import cv2

import imutils
First of all our image is not uniform, hence we need to perform some functions on the image so that the useful information from the image is not lost. Therefore we use the libraries. The skimage. filters. threshold_local creates a threshold mask image of the original image. A threshold value is fix value and according to the threshold value, we obtain a mask image. This is necessary because the image may contain any noises, which we remove through this.
Step 2: We define a method order_coordinates as follows:
def order_coordinates(pts):

            rectangle = np.zeros((4, 2), dtype = "float32")

            s = pts.sum(axis = 1)

            rectangle[0] = pts[np.argmin(s)]

            rectangle[2] = pts[np.argmax(s)]

            difference = np.diff(pts, axis = 1)

            rectangle[1] = pts[np.argmin(difference)]

            rectangle[3] = pts[np.argmax(difference)]

            return rectangle
The ordered rectangular co-ordinates are returned by the method defined here.
Step 3: Defining another method point_transform :
def point_transform(image, pts):

            rect = order_coordinates(pts)

            (upper_left, upper_right, bottom_right, bottom_left) = rect

            width1 = np.sqrt(((bottom_right[0] – bottom_left[0]) ** 2) + ((bottom_right[1] – bottom_left[1]) ** 2))

            width2 = np.sqrt(((upper_right[0] – upper_left[0]) ** 2) +((upper_right[1] – upper_left[1]) ** 2))

            Width = max(int(width1), int(width2)) #considers maximum width value as Width

            height1 = np.sqrt(((upper_right[0] – bottom_right[0]) ** 2) +((upper_right[1] – bottom_right[1]) ** 2))

            height2 = np.sqrt(((upper_left[0] – bottom_left[0]) ** 2) + ((upper_left[1] – bottom_left[1]) ** 2))

            Height = max(int(height1), int(height2)) #considers maximum height value as Height

            distance = np.array([[0, 0],[Width - 1, 0],[Width - 1, Height - 1],[0,Height - 1]], dtype ="float32")

            Matrix = cv2.getPerspectiveTransform(rect, distance)

            warped_image = cv2.warpPerspective(image, Matrix, (Width, Height))

            return warped_image
The ordered points are obtained and then unpacked into four variables which are labeled as upper_left, upper_right, bottom_left, bottom_right respectively. Then the width of the new image is the maximum distance between upper_right & upper_left and bottom_right & bottom_left x-coordinates. Similarly, the height of the image is the maximum distance between upper_right & bottom_right and upper_left & bottom_left y-coordinates. Then the dimensions of the new image are stored in the variable distance. Performing calculation of a perspective transforms from four pairs of the corresponding points and the application a perspective transformation to the image. As a result, we get the final warped image.
Step: 4 Capturing the Image:
capture=cv2.VideoCapture(0)
while(True):
ret,image=capture.read()
image=cv2.imread(#image-path and name)
ratio=image.shape[0]/image.shape[1]
original=image.copy()
image=imutils.resize(image,height=500)
gray=cv2.cvtColor(image,cv2.COLOR_BGR2GRAY)
gray=cv2.GaussianBlur(gray,(5,5),0)
edged=cv2.Canny(gray,75,200)
contours = cv2.findContours(edged.copy(), cv2.RETR_LIST, cv2.CHAIN_APPROX_SIMPLE)
contours = imutils.grab_contours(contours )
contours = sorted(contours , key = cv2.contourArea, reverse = True)[:5]
for ci in contours :
perimeter = cv2.arcLength(ci, True)
approx = cv2.approxPolyDP(ci, 0.02 * perimeter, True)
if len(approx) == 4:
screenCnt = approx
break
warped = point_transform(original, screenCnt.reshape(4, 2) * ratio)
warped = cv2.cvtColor(warped, cv2.COLOR_BGR2GRAY)
T = threshold_local(warped, 11, offset = 10, method = "gaussian")
warped = (warped > T).astype("uint8") * 255
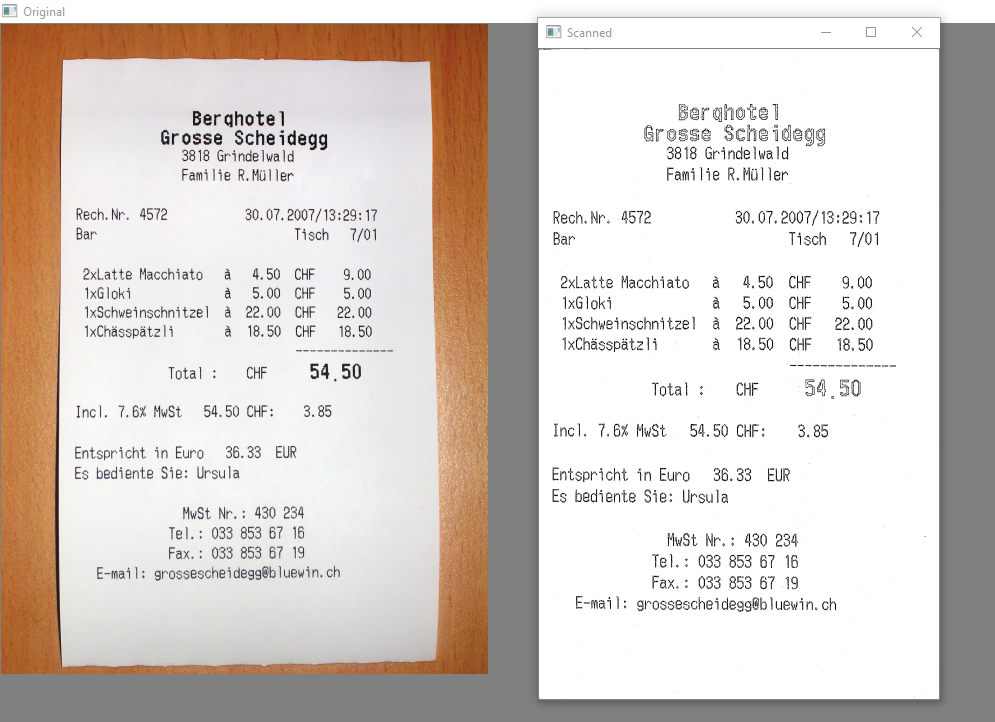
cv2.imshow("Original", imutils.resize(original, height = 650))
cv2.imshow("Scanned", imutils.resize(warped, height = 650))
if cv2.waitKey(0):
break
capture.release()
cv2.destroyAllWindows()
The image is captured, resized because the captured image may be of varying sizes, hence to maintain uniformity and then converted to grayscale so that the images are in black and white format after which the edges are detected. Contours join all the continuous points, having the same color or intensity. Each individual contour is an array of x and y coordinates of boundary points of the object which are then sorted according to the area. The contours are then approximated and checked if it has four points. If it has four points then it is considered as our screen. Then the warped image is converted to grayscale and threshold it. As a result, we get a proper paper view of the image.
Also read:
Watermark image using opencv in python
Output of document scanner build in Python
This is how we can build a document scanner in Python.
i am nataraj, i am currently working python developer, i am using your code but the post_transform function error, the error its get invalid character identifier(line width1)
the code is working but can i save the ducument after scanning
You can use
cv2.imwrite( #filename, imutils.resize(warped, height=650))
The code is not working for me, I’m not sure why