How to use TableLayout in Java Swing
 By Priyam Apoorwa
Java Swing provides a bunch of pre-made components (like buttons, text fields, and windows) that we can use to build our own applications. It’s like having a toolbox full of building blocks that we can put together to create our very own apps.
Table layout is a way to organize components (like buttons and text fields) in our GUI. Imagine you’re organizing your desk – you might put your pens in one corner, your papers in another, and your laptop in the middle. Table layout helps us do the same thing with our GUIs. With table layout, we can arrange our components in rows and columns, just like a table. This makes it easy to line things up neatly and make our apps look nice and organized.
In Java Swing, “TableLayout” is not a standard layout manager provided by the JDK. Hence, we will achieve the TableLayout in Swing by using a combination of JTable, DefaultTableModel, and BorderLayout for the layout of the components within the JFrame.
For example, we will create a simple expense tracker in Table Layout via Java Swing with three columns as Name of expense, amount and date with the expenses as rows which can be added and deleted. The steps to achieve this and the components used will be:
1. **Setting Up the Frame and Components**:
– We start by creating a window for our application using JFrame. Think of `JFrame` as the main window of our program.
– Inside this window, we want to display a table to track our expenses. To do this, we use a `JTable`, which is like a grid where we can put our data.
– We also need something to manage our table data. That’s where `DefaultTableModel` comes in. It helps us manage the rows and columns of our table.
– Additionally, we create two buttons: one to add new expenses and another to delete existing ones.
2. **Arranging Components in the Layout**:
– We want our window to look organized, so we use a layout manager called `BorderLayout`. This manager helps us position components (like labels, buttons, and tables) in different areas of the window, such as top, bottom, left, right, or center.
– We add a title label at the top of the window to let users know what our app is about.
– The table, which shows our expenses, goes in the middle of the window. We use a `JScrollPane` to make sure the table can scroll if there are too many expenses to fit in the window.
– The buttons to add and delete expenses go at the bottom of the window.
3. **Handling User Interactions**:
– When the user clicks the “Add” button, we want to prompt them to enter details about a new expense (like name, amount, and date). We do this using pop-up dialog boxes.
– Once the user enters the details, we add a new row to our table with the information they provided.
– If the user clicks the “Delete” button, we ask them which expense they want to remove. Then we find and delete that expense from our table.
4. **Displaying Table Content**:
– After the user adds or deletes an expense, we want to show them the updated table content in the console. We do this by iterating through the rows and columns of our table and printing the data.
The below code shows the example of a table layout in the form of an expense tracker with rows and column, we import Swing libraries for using Default Table Model to construct the layout and Awt libraries for using action listener for providing functionalities to the buttons in the table layout :
import javax.swing.*;
import javax.swing.table.DefaultTableModel;
import java.awt.*;
import java.awt.event.ActionEvent;
import java.awt.event.ActionListener;
public class TableLayoutExample extends JFrame {
private JTable table;
private DefaultTableModel tableModel;
public TableLayoutExample() {
setTitle("Table Layout Example");
// Create table model with columns: Expense, Amount, Date
String[] columns = {"Expense", "Amount", "Date"};
tableModel = new DefaultTableModel(columns, 0);
table = new JTable(tableModel);
// Create scroll pane for the table
JScrollPane scrollPane = new JScrollPane(table);
// Create buttons: Add and Delete
JButton addButton = new JButton("Add");
JButton deleteButton = new JButton("Delete");
addButton.addActionListener(new ActionListener() {
@Override
public void actionPerformed(ActionEvent e) {
// Prompt user to enter expense, amount, and date
String expense = JOptionPane.showInputDialog("Enter Expense:");
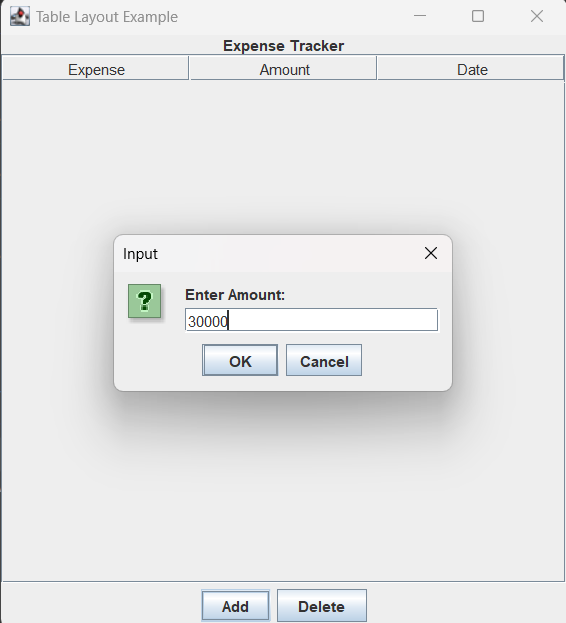
String amount = JOptionPane.showInputDialog("Enter Amount:");
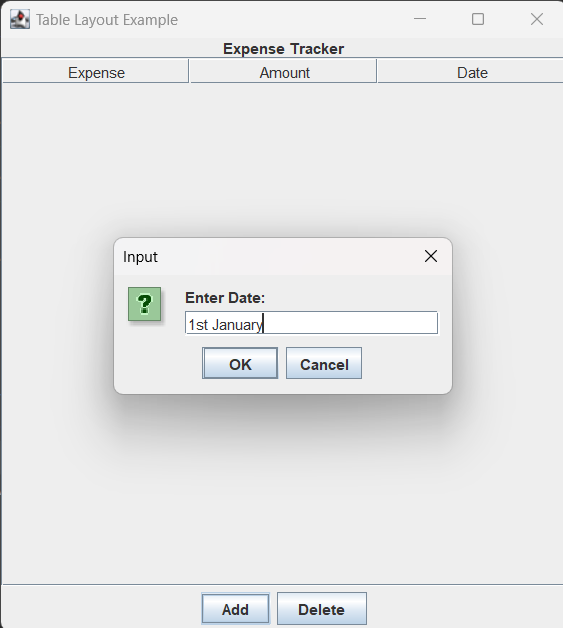
String date = JOptionPane.showInputDialog("Enter Date:");
// Add the input to the table
tableModel.addRow(new String[]{expense, amount, date});
// Display table content after adding
displayTableContent();
}
});
deleteButton.addActionListener(new ActionListener() {
@Override
public void actionPerformed(ActionEvent e) {
// Prompt user to enter the expense to delete
String expenseToDelete = JOptionPane.showInputDialog("Enter Expense to Delete:");
// Search for the expense in the table and delete it
for (int i = 0; i < tableModel.getRowCount(); i++) {
if (tableModel.getValueAt(i, 0).equals(expenseToDelete)) {
tableModel.removeRow(i);
break;
}
}
// Display table content after deleting
displayTableContent();
}
});
// Create panel for buttons
JPanel buttonPanel = new JPanel();
buttonPanel.add(addButton);
buttonPanel.add(deleteButton);
// Create panel for the layout
JPanel mainPanel = new JPanel(new BorderLayout());
mainPanel.add(new JLabel("Expense Tracker", SwingConstants.CENTER), BorderLayout.NORTH);
mainPanel.add(scrollPane, BorderLayout.CENTER);
mainPanel.add(buttonPanel, BorderLayout.SOUTH);
getContentPane().add(mainPanel);
pack();
setLocationRelativeTo(null); // Center the window
setDefaultCloseOperation(JFrame.EXIT_ON_CLOSE);
setVisible(true);
}
private void displayTableContent() {
System.out.println("Expense\tAmount\tDate");
for (int row = 0; row < tableModel.getRowCount(); row++) {
for (int col = 0; col < tableModel.getColumnCount(); col++) {
System.out.print(tableModel.getValueAt(row, col) + "\t");
}
System.out.println();
}
}
public static void main(String[] args) {
SwingUtilities.invokeLater(new Runnable() {
@Override
public void run() {
new TableLayoutExample();
}
});
}
}
The Table Layout for an expense tracker will look like this:

We can add expenses, amount and the date by using the add button:

We can also delete expenses via the delete button by giving the name of the expense to be deleted:
![]()
The final table layout will look like:

Hence, by using JTable DefaultTableModel and BorderLayout components from JFrame we can make Table Layout in Java Swing.
Leave a Reply