Google Maps Integration in SwiftUI
 By shagrafnasheet
In this SwiftUI tutorial, we’ll be learning to integrate Google Maps into SwiftUI step by step. We’ll be using a static location for showing on the map.
Key Steps:
- Create API key
- Enable Google Maps SDK for iOS
- Install Google Map pods into the project
- Add the required keys to the info.Plist
- Add the AppDelegate file to the project and add the API key to the project
- Create a GoogleMapView class and initiate the map view
Let’s get started
1) Create API Key
To create an API key go to Google Console and into the credentials sections and create a new API key.
You can also look for APIs and services option. (Don’t forget to create a project and inside the project you will get those options)
Creadentials -> Enable Api and services -> API key
After creating the key click on the edit option of the key then restrict the API for iOS Apps and it will need the bundle identifier of your project.

2) Enable Google Maps SDK for iOS
Now into the Enable API and services and enable the Google Maps SDK for iOS.

3) Install Google Map pods into the project
For initializing the Google Maps SDK install this Google Maps pod into your project.
pod 'GoogleMaps'
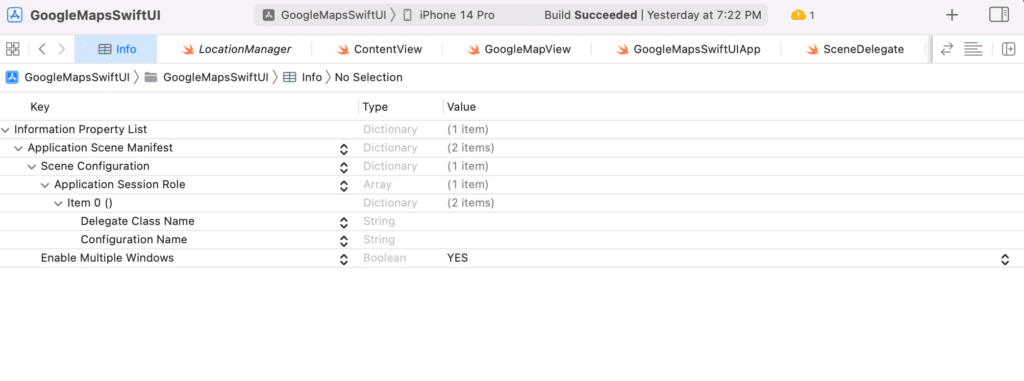
4) Add the required keys to the info.Plist
Add the Scene Configuration key to your info.Plist. See the screenshot given below for more clearer reference.
5) Add the AppDelegate file to the project
Now by default, there’s no App delegate file in SwiftUI projects. So we’ll be adding the Appdelagate file to our project and then we’ll enable the Google Maps services by providing the API key.
Create a new swift file named AppDelagte and the code given below into the file.
import UIKit
import GoogleMaps

class AppDelegate: UIResponder, UIApplicationDelegate {

    func application(_ application: UIApplication, didFinishLaunchingWithOptions launchOptions: [UIApplication.LaunchOptionsKey: Any]?) -> Bool {
        // Override point for customization after application launch.
        GMSServices.provideAPIKey("YOUR_API_KEY")
        return true
    }

    // MARK: UISceneSession Lifecycle

    func application(_ application: UIApplication, configurationForConnecting connectingSceneSession: UISceneSession, options: UIScene.ConnectionOptions) -> UISceneConfiguration {
        return UISceneConfiguration(name: "Default Configuration", sessionRole: connectingSceneSession.role)
    }

    func application(_ application: UIApplication, didDiscardSceneSessions sceneSessions: Set<UISceneSession>) {
      }
}
Replace the “YOUR_API_KEY” string with your actual API Key and don’t forget to add the restrictions else it won’t work.
6) Create a GoogleMapView class and initiate the map view
Now create a new SwiftUI file named GoogleMapView and the below given code into the file.
struct GoogleMapsView: UIViewRepresentable {

    private let zoom: Float = 25.0


    func makeUIView(context: Self.Context) -> GMSMapView {

        let camera = GMSCameraPosition.camera(withLatitude: 22.58093148156094, longitude: 88.48038569479492, zoom: zoom)
        let mapView = GMSMapView.map(withFrame: CGRect.zero, camera: camera)
        mapView.camera = camera
        return mapView
    }

    func updateUIView(_ mapView: GMSMapView, context: Context) {
    }

}

struct GoogleMapsView_Previews: PreviewProvider {
    static var previews: some View {
        GoogleMapsView()
    }
}
Here we have initialized our map view with the static longitude and latitude values.
Now We’ll be calling this map view in our main ContentView.
Content View:
struct ContentView: View {
    var body: some View {
        VStack {
            GoogleMapsView()
                .frame(maxWidth: UIScreen.main.bounds.width, maxHeight: UIScreen.main.bounds.height)
        }.edgesIgnoringSafeArea(.all)

            .padding()
    }
}

struct ContentView_Previews: PreviewProvider {
    static var previews: some View {
        ContentView()
    }
}
Here in the main ContentView, we have simply called the GoogleMapsView() constructor inside the VStack.
Now when we run the App we’ll be able to see the map on our device screen. Next, we’ll be adding markers to our map.
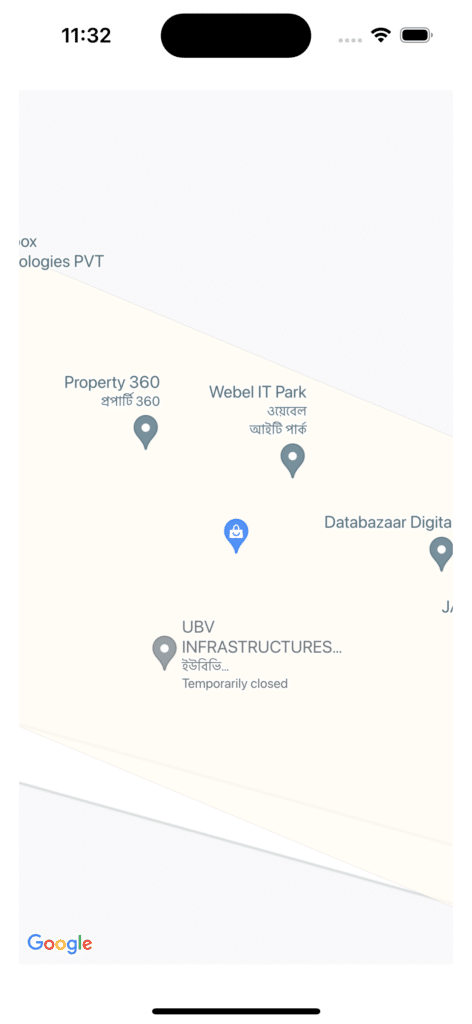
Add Markers to the map
Now we’ll add markers to the map so that it will point to our specified location and we’ll give it a title as well.
    let mapCenter = CLLocationCoordinate2DMake(mapView.camera.target.latitude, mapView.camera.target.longitude)

        let marker = GMSMarker(position: mapCenter)

        marker.title = "CodeSpeedy Technology"

        marker.snippet = "Web Development & Mobile App Development"

        marker.map = mapView
We’ll be adding this code in the GoogleMapsView class in the function where we are initializing the map view with the desired latitude and longitude.
import SwiftUI
import GoogleMaps


struct GoogleMapsView: UIViewRepresentable {

    private let zoom: Float = 25.0

    func makeUIView(context: Self.Context) -> GMSMapView {

        let camera = GMSCameraPosition.camera(withLatitude: 22.58093148156094, longitude: 88.48038569479492, zoom: zoom)
        let mapView = GMSMapView.map(withFrame: CGRect.zero, camera: camera)
        mapView.camera = camera

        // add marker
        let mapCenter = CLLocationCoordinate2DMake(mapView.camera.target.latitude, mapView.camera.target.longitude)
        let marker = GMSMarker(position: mapCenter)
        marker.title = "CodeSpeedy Technology"
        marker.snippet = "Web Development & Mobile App Development"
        marker.map = mapView

        return mapView
    }

    func updateUIView(_ mapView: GMSMapView, context: Context) {
    }

}

struct GoogleMapsView_Previews: PreviewProvider {
    static var previews: some View {
        GoogleMapsView()
    }
}

Also, don’t forget to add this line to the main App file of the project. This line will give the app the reference of the AppDelegate file.
@UIApplicationDelegateAdaptor(AppDelegate.self) var appDelegate
import SwiftUI
import GoogleMaps

@main
struct GoogleMapsSwiftUIApp: App {
    @UIApplicationDelegateAdaptor(AppDelegate.self) var appDelegate

    var body: some Scene {
        WindowGroup {
              ContentView()
        }
    }
}
Can you cover more about this topic like how to get user current location, how user search new location and also creating routes from there current location to the end location they wan to go