Customize sheet in SwiftUI
 By Samim
In this tutorial, we will see how we can customize a sheet in SwiftUI.
A sheet is a common UI element for displaying secondary views or modals. Sheets have a default appearance, but we often customize them to match the style of our application.
Sheets in SwiftUI come with a default background color, which is typically white or a system-defined background color. This color changes based on the device’s appearance settings, such as light or dark mode.
This tutorial will cover the topics below.
- Changing the background color of the sheet
- Make the background of the sheet gradient
- Use an image as a background for a sheet
- Set a fixed sheet height
- Set a minimum and maximum sheet height
- Create a half-screen sheet
Let’s explore every topic mentioned above one by one.
Changing the background color of the sheet
We can apply the background() modifier within the sheet to change the background color of a sheet.
First of all, we have to apply the frame() modifier to occupy the maximum available width and height, so the background color will cover the entire sheet area.
Then we can use the background() modifier with a specific color to change the color of the sheet.
Example
import SwiftUI
struct ContentView: View {
// State variable to control the visibility of the sheet
@State private var showSheet = false
var body: some View {
// Button to trigger the sheet presentation
Button("Show Sheet") {
// Toggle the state variable to show/hide the sheet
showSheet.toggle()
}
// Sheet view that is presented when the showSheet state is true
.sheet(isPresented: $showSheet) {
// Content of the sheet
VStack {
Text("Hello, This is a sheet")
}
// Fill the entire available space of the sheet
.frame(maxWidth: .infinity, maxHeight: .infinity)
// Set the background color of the sheet
.background(Color.mint)
}
}
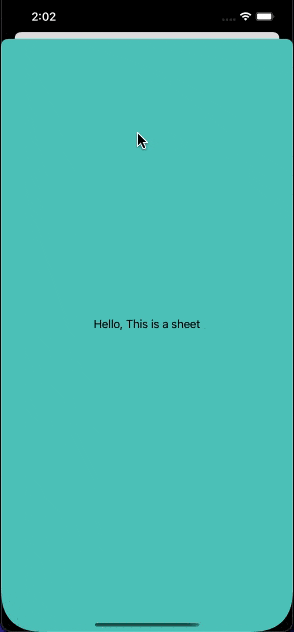
}In the above program, I have used the frame() modifier and set the maxWidth and maxHeight to infinity to occupy the maximum available width and height of the sheet. This is important to ensure that the background color covers the entire sheet area.
Then, I have applied the background() modifier and specified the color mint to the VStack inside the sheet to change the background color of the sheet to mint.
Output:
Make the background of the sheet gradient
We can also make the background of the sheet gradient using the background() modifier. We will apply the linear gradient here to make the background gradient.
Syntax
LinearGradient(
    gradient: Gradient(colors: [Color1, Color2, ...]),
    startPoint: UnitPoint,
    endPoint: UnitPoint
)
We can simply put the above code within the background() modifier, passing our preferred colors, starting point, and ending point to create a gradient background.
Now, have a look at the example below.
import SwiftUI

struct ContentView: View {

    @State private var showSheet = false

    var body: some View {
        Button("Show Sheet") {
            showSheet.toggle()
        }
        .sheet(isPresented: $showSheet) {
            VStack {
                Text("Hello, This is a sheet")
            }
            .frame(maxWidth: .infinity, maxHeight: .infinity)

            // To change the background color of the sheet
            .background (
                // To make the background color of the sheet gradiend
                LinearGradient(gradient: Gradient(colors: [Color.red, Color.blue]), startPoint: .top, endPoint: .bottom)
            )
        }
    }
}
In the above code, I have applied the gradient background using the background() modifier to the VStack inside the sheet.
So, when we tap the button “Show Sheet” it will display a sheet with a gradient background that will transition from red at the top to blue at the bottom.
Output:

Use an image as a background for a sheet
We can also use an image as a background of the sheet in SwiftUI. Simply inside the background() modifier we have to use the Image view to add an image as a background of the sheet.
Syntax:
Image("yourImageName")Replace “yourImageName” with the actual name of the image asset. We must ensure that our image is added to the Assets folder in our Xcode project.
Example
import SwiftUI

struct ContentView: View {

    @State private var showSheet = false

    var body: some View {
        Button("Show Sheet") {
            showSheet.toggle()
        }
        .sheet(isPresented: $showSheet) {
            VStack {
                Text("Hello, This is a sheet")
                    .font(.title)
                    .foregroundColor(.red)
            }
            .frame(maxWidth: .infinity, maxHeight: .infinity)

            // Ignore safe area edges to cover the entire sheet
            .background (
                Image("myImage")
                    //To Makes the image resizable
                    .resizable()
                    //Scale the image to fill the available space
                    .scaledToFill()
                    // Ignore safe area edges to cover the entire sheet
                    .edgesIgnoringSafeArea(.all)
            )
        }
    }
}
The above code will display a sheet with red colored text and an image as the background.
Output:

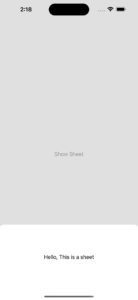
Set a fixed sheet height
We can also set the height of the sheet to make information look good, keep things organized, and work well on different devices.
For this purpose, we have to use the presentationDetents() modifier. We can specify the height into this modifier to set a fixed sheet height.
This modifier only works in iOS 16 and above versions.
Syntax:
.presentationDetents([.height(200)])
We have to simply apply the above modifier to the sheet that will set the sheet height to 200.
Example
import SwiftUI

struct ContentView: View {

    @State private var showSheet = false

    var body: some View {
        Button("Show Sheet") {
            showSheet.toggle()
        }
        .sheet(isPresented: $showSheet) {
            VStack {
                Text("Hello, This is a sheet")
            }
            //To set the sheet height
            .presentationDetents([.height(200)])
        }
    }
}
In the above program, I have applied the .presentationDetents() modifier with a height of 200 to set the height of the sheet to 200 points.
So, the sheet will appear with a specific height which is 200.
Output:
Set a minimum and maximum sheet height
We can also set a minimum and maximum sheet height using the presentationDetents() modifier. This modifier allows us to define a range of heights for our sheet.
Syntax:
.presentationDetents([.height(200), .height(450)])
In the above code, I have set the minimum height to 200 and the maximum height to 450.
So, the sheet will appear with a height of 200 and when we drag up the sheet it will extend to 450 points.
Example
import SwiftUI

struct ContentView: View {

    @State private var showSheet = false

    var body: some View {
        Button("Show Sheet") {
            showSheet.toggle()
        }
        .sheet(isPresented: $showSheet) {
            VStack {
                Text("Hello, This is a sheet")
            }
            //To set a minimum and maximum sheet height
            .presentationDetents([.height(200), .height(450)])
        }
    }
}
Output:

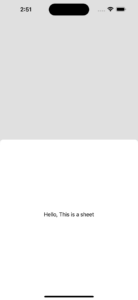
Create a half-screen sheet
We can create a half-screen sheet using the presentationDetents() modifier by specifying the .medium into this modifier.
Syntax:
.presentationDetents([.medium])
We can replace the .medium with .large to make the sheet larger or .small to make the sheet smaller.
Example
import SwiftUI

struct ContentView: View {

    @State private var showSheet = false

    var body: some View {
        Button("Show Sheet") {
            showSheet.toggle()
        }
        .sheet(isPresented: $showSheet) {
            VStack {
                Text("Hello, This is a sheet")
            }
            //To create a half-screen sheet
            .presentationDetents([.medium])
        }
    }
}
The .medium, .large, and .small represent different size classes for the sheet. We can choose the one that best fits our design preferences.
Output:
Leave a Reply