Create a web application to determine the presence of the image in database
 By Aditya Pradhan
Hello everyone, In this tutorial you will learn how to create a Plant Identification App.
Follow the following steps to create the Plant Identification App
- In the 1st step create a JS file where you use node.js and express.js to develop the backend code
- In the 2nd step create EJS templates which act as HTML files to create the frontend
- In the 3rd step, create a database using PostgreSQL, an RDBMS.
Steps to create the backend or server code
Follow the following steps to create the backend or server code by using JavaScript for the Plant Identification App.
- In the 1st step open VS code and create a JS file named plantserver.js.
- In the 2nd step in the project directory through the terminal install all the node modules.
Use the npm install as a command line to install the node modules
- After the npm is installed in the project directory, the necessary packages are installed to run the app.
- The packages are multer, express.js, jQuery, pg, and ejs.
- In the terminal use the command line that is npm install multer, npm install express, and so on.
- Use the above code lines to install the further packages in the project directory.
- In the next step install a package named nodemon used to save and restart the server automatically.
The JavaScript File
import express from "express";
import path from "path";
import multer from "multer";
import pg from "pg";

const app = express();
const port = 3000;

const db = new pg.Client({
  user: "postgres",
  host: "localhost",
  database: "plantdata",
  password: "ILOVEYOU3000",
  port: 5432,
});

db.connect();

const storage = multer.diskStorage({
  destination: function (req, file, cb) {
    return cb(null, "./uploads");
  },
  filename: function (req, file, cb) {
    const uniqueSuffix = Date.now() + Math.round(Math.random() * 1e9);
    return cb(null, `${uniqueSuffix}-${file.originalname}`);
  },
});

const upload = multer({ storage });
app.set("view engine", "ejs");
app.set("views", path.resolve("./views"));

app.use(express.json());
app.use(express.urlencoded({ extended: false }));
app.use(express.static("public"));

app.get("/", (req, res) => {
  res.render("homepage.ejs");
});

app.get("/upload-image", (req, res) => {
  res.render("uploadImage.ejs");
});

app.get("/check-image", (req, res) => {
  res.render("checkImage.ejs");
});

app.post("/upload", upload.single("profileImage"), (req, res) => {
  console.log(req.body);
  console.log(req.file);

  return res.redirect("/");
});

app.post("/upload-image", upload.single("ImageData"), async (req, res) => {
  try {
    const image = req.file;
    if (!image) {
      return res.status(400).send("No image uploaded");
    }

    const result = await db.query(
      "INSERT INTO images (name, path) VALUES ($1, $2)",
      [image.originalname, image.path]
    );

    res.send("Image uploaded successfully!");
  } catch (err) {
    console.error("Error uploading image:", err);
    res.status(500).send("An error occurred while uploading the image");
  }
});

app.post("/check-image", async (req, res) => {
  const imageName = req.body.imageName;

  try {
    const result = await db.query("SELECT * FROM images WHERE name = $1", [
      imageName,
    ]);

    console.log("Query result:", result.rows);

    if (result.rows.length > 0) {
      res.send("Image found: " + result.rows[0].description);
    } else {
      res.send("Image not found in the database");
    }
  } catch (err) {
    console.error("Error checking image:", err);
    res.status(500).send("An error occurred while checking the image");
  }
});

app.listen(port, () => {
  console.log(`The server is open at http://localhost:${port}`);
});
Explanation of JavaScript file
Okay as discussed earlier install those 4 packages and import them i.e. express multer, pg, and path to create a Plant Identification App.
- Use the package named express which is the most popular web framework in node.js for building web applications.
- The package named multer uses this package to handle the files’ uploading and storage in specified locations.
- Use the package named pg i.e. PostgreSQL used to connect to the database and perform operations like querying.
- Use the package path to provide the utilities on working files and the project directory.
- const app = express();
- As use this express framework to build the web application.
- const port = 3000;
- Create a port with a value of 3000 to host the web application.
const db = new pg.Client({…….});
- Use the above code i.e. const db = new pg.Client({…….}); to connect the server and the PostgreSQL.
- Use new pg.Client({………}) to define the properties of the PostgreSQL i.e. username, password, port, host, and database.
new pg.Client({
user: “postgres”,
host: “localhost”,
database: “plantdata”,
password: “ILOVEYOU3000”,
port: 5432,
});
Define the above properties as you have defined them in your PostgreSQL database (Don’t copy the same data)
db.connect();
- Use the above code line to connect the server code to the PostgreSQL database to retrieve the data from it.
Explanation of Uploading the files
- Use the above code to call the function named diskStorage provided by the package named multer.
- Then use the function diskStorage to define and guide how the files are to be uploaded to the server side or storage.
destination: function (req, file, cb) {return cb(null, “./uploads”);}
- Use this code line to specify the destination directory where the uploaded files are stored
- The keyword file describes the information of the uploaded files
- The keyword cb is the callback function.
{return cb(null, “./uploads”)}
- Use this to ensure that all the files are uploaded in the folder named Uploads in the project directory itself.
- To upload all the files create a folder in the project directory named uploads to store all the uploaded files.
filename: function (req, file, cb) {………….}
- Use this line to ensure that all the files that are uploaded in the given folder are assigned a proper name.
- Create a unique name and assign it to the uploaded file by using the current date, timestamp, and a unique number to prevent name conflict in the folder.
- Use this code line to ensure that it preserves the original extensions of the uploaded file while creating a unique identifier for those files.
- Create this code to access all the uploaded files present in the object named storage into the variable named upload
- Use the function named multer earlier to store all the uploaded files in the object named storage.
- Use this variable to process the uploaded files in the express web framework which creates the web applications.
- Create this code to depict that all EJS templates are stored in the folder named views present in the project directory itself.
Explanation of handling the format of the uploaded file data on the server side
The code line i.e. app. use(express.json()); use this line to handle all the incoming requests from the uploaded files which are in JSON format.
app. use(express.urlencoded({extended: false}))
- Use this line to handle all the incoming requests coming from the HTML file which are in the URL encoded format
app. use(express. static(“public”));
- Use this code line to handle all the static files such as HTML, CSS, and JS files that are present in the project directory.
EJS templates to create Plant Identification App
Use the EJS templates because these templates act as the HTML files that depict the role of creating the frontend in the web application.
You can use the EJS templates to create different frontend pages such as
- HomePage
- Uploading Images in the database
- Identify the Image by selecting the file from the folder
Use the EJS templates to build these 3 user interfaces i.e.
- HomePage which is the introductory page for the users and the clients
- Uploading the images through this interface you can upload the image to the database
- Identifying the Image through this interface you can identify every plant image if the data is present in the database.
Install the package of the ejs in the project directory through the following command line i.e. npm install ejs.
Provide the names for those 3 EJS templates i.e. homepage.ejs, uploadImage.ejs, and checkImage.ejs.
- Use “/” as the endpoint that directly indicates the root path it means after the server is executed homepage.ejs template will be shown to the user.
- Use res.render to redirect to the new webpage of the homepage.ejs template.
- Now use the same above code line to render to the different ejs templates i.e. uploadImage.ejs and checkImage.ejs.
- Use different endpoints to render those 2 EJS templates.
- Use “/upload-image” for the uploadImage.ejs template and “check-image” for the checkImage.ejs template.
app.post(“/upload”, upload.single(“profileImage”), (req, res) => {………………..});
- Use this code line to select the image or file from the folder and upload it to the server side by using POST requests.
- Then inside the above code use this code line i.e. return res.redirect(“/”);
- You can use this code line to directly render the homepage after the image is uploaded to the server side.
PostgreSQL Database
Now use the PostgreSQL database to upload image data, path, and description in the data table.
You can refer to this YouTube video link that how to install and setup PostgreSQL and pgAdmin by Clicking here
Follow the following steps to create the database and table in the PostgreSQL database
- Create a database named plantdata
- Now in the database create a data table named images by using a query i.e.
- Use the below query to create the table in the database
CREATE TABLE images (
    id SERIAL NOT NULL,
    name VARCHAR(255),
    path VARCHAR(255),
    description VARCHAR(255)
);
app.post(“/upload-image”, upload.single(“ImageData”), async, (req, res) => {………………..});
- Use this code line to listen to the port with the endpoint “/upload-image,” from which POST requests will be handled to upload the images.
- The line upload.single(“ImageData”), use this to access the upload instance provided by multer to upload the images with the field named ImageData.
- Then use the async(req, res) code line to hold all the further code execution until this function is declared and called.
try {………………} catch(error) {………….}
- Use try and catch block element for uploading the images in the database.
- You can use the query to insert the image name and path in the data table named images you have created in the database named plantdata.
- Use the try-and-catch block element because if the uploading of an image is not successful in the database it will not crash the website rather it will show an error.
const image = req.file;
- Use this code line to access all the information about the uploaded images or the files present in the object named req.file
- Use this code line to ensure that the user selects an image to upload to the database otherwise, it will send a message that no image was uploaded to the database.
Inserting query in the server side
const result = await db.query(…………………..);
- Create this code line to insert the query and make asynchronous functions to hold the rest of the code execution to upload the image in the database.
- Now use the above query to insert the image name and path into the database which is extracted from the image.originalname and image.path.
Pass a message for uploading the image successfully in the database.
Create the catch block element to catch the error otherwise, it will crash the app.
app.post(“/check-image”, async, (req, res) => {………………..});
- Use this code line to listen to the port with the endpoint “/check-image,” to identify the image using POST requests.
- Use the asynchronous function
- Now use the try and catch block element to identify the plant image if present otherwise show the error instead of crashing the app.
const result = await db.query(“SELECT * FROM images where name = $1”, [imageName]);
- Now use the above query by selecting the image from the database and then match the image name present in the body named imageName
- Now create the if and else statements to check if the image is present in the database then result.rows.length will be greater than 0 as the image is found.
- Use the description column to print the name of the plant image.
- Create the catch block element in case the image is not present in the database.
- Use this code to execute the server and open it at the destination port.
Steps to create the EJS templates i.e. user interface
Create the introductory interface i.e. homepage.ejs as this is the root path that will open first after the server is executed
<!DOCTYPE html>
<html lang="en">
  <head>
    <meta charset="UTF-8" />
    <meta name="viewport" content="width=device-width, initial-scale=1.0" />
    <title>Plant Identification App</title>
  </head>
  <body>
    <h1 id="headingone">Welcome everyone</h1>
    <h2 id="headingtwo">Plant identification web app</h2>
    <a
      class="btn btn-light btn-lg"
      href="/upload-image"
      role="button"
      style="margin-left: 680px"
      >Upload</a
    >
    <a class="btn btn-light btn-lg" href="/check-image" role="button"
      >Identify Image</a
    >

    <style>
      #headingone {
        text-align: center;
      }

      #headingtwo {
        text-align: center;
      }
    </style>
  </body>
</html>

Plant Identification App
Now on the homepage create 2 anchor tags through which the user can render to 2 different interfaces i.e.
- The first page will upload the image to the database
- The second page will be to identify the plant
Now create another user interface i.e. uploadImage.ejs template where the user can upload the image to the PostgreSQL database.
<!DOCTYPE html>
<html lang="en">
  <head>
    <meta charset="UTF-8" />

    <meta name="viewport" content="width=device-width, initial-scale=1.0" />

    <title>Upload the Image</title>
  </head>
  <body>
    <h1>Please Upload the Image in the Database</h1>

    <form action="/upload-image" method="POST" enctype="multipart/form-data">
      <input type="file" name="ImageData" />
      <button type="submit">Upload</button>
    </form>
  </body>
</html>
Create the form and select the input type as file through which you can select the image or files from any folder.
Use enctype=”multipart/form-data” to upload the image along with the other related information about the file.
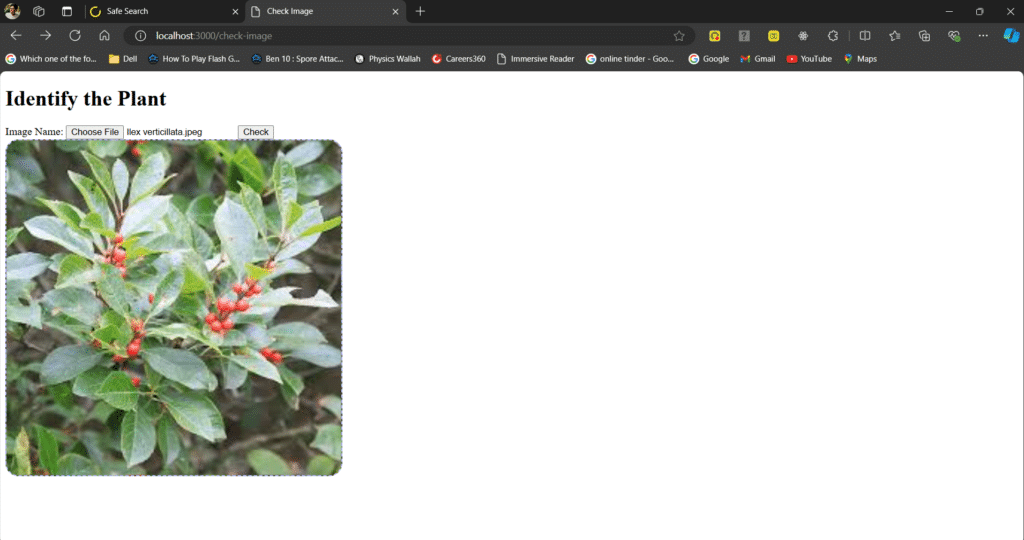
Now create another user interface i.e. checkImage.ejs template where the user can select the image from the folder and identify it.
<!DOCTYPE html>
<html lang="en">
  <head>
    <meta charset="UTF-8" />
    <meta name="viewport" content="width=device-width, initial-scale=1.0" />
    <title>Check Image</title>
  </head>
  <body>
    <h1>Identify the Plant</h1>
    <form action="/check-image" method="POST" id="drop-area">
      <label for="imageName">Image Name:</label>
      <input
        type="file"
        accept="image/*"
        name="imageName"
        id="imageName"
        required
      />
      <button type="submit">Check</button>
    </form>
    <div id="img-view"></div>
    <style>
      #img-view {
        width: 500px;
        height: 500px;
        border-radius: 20px;
        border: 2px dashed #bbb5ff;
        background: #f7f8ff;
        background-size: cover;
      }
    </style>

    <script>
      const dropArea = document.getElementById("drop-area");
      const ImageName = document.getElementById("imageName");
      const imageView = document.getElementById("img-view");

      ImageName.addEventListener("change", uploadImage);

      function uploadImage() {
        let imgLink = URL.createObjectURL(ImageName.files[0]);
        imageView.style.backgroundImage = `url(${imgLink})`;
      }
    </script>
  </body>
</html>
Now create the script tag in the ejs template and write the JS code to take an image as input in the interface.
Also, create the style tag to resize the image in the center of the box.
In the create access all the id i.e. imageName, drop-Area, and img-view select the image from the folder and show it in the box.
Now create a function named uploadImage() and use the addEventListener method to upload and show the image in the dedicated box rather than on the whole background.
Output
Step 1 : Open VS code and write in the terminal nodemon plantserver.js to execute the server
Step 2 : Click on Upload link on the Homepage to render to the webpage where you can upload the image in database
Step 3 : Open the PostgreSQL database and access the plantdata Database where the data of plant images are stored
Step 4 : Open browser and download any plant image and store in the folder
Step 5 : Then in the Upload interface choose the plant the image from the folder and upload in the database
Step 6 : Then write the query to update the description column of the data table to provide output of plant image
Step 7 : Update the description column with the query i.e.
UPDATE <table_name>
SET description : 'Write your content'
WHERE condition
Here condition means on which id you want to update the description
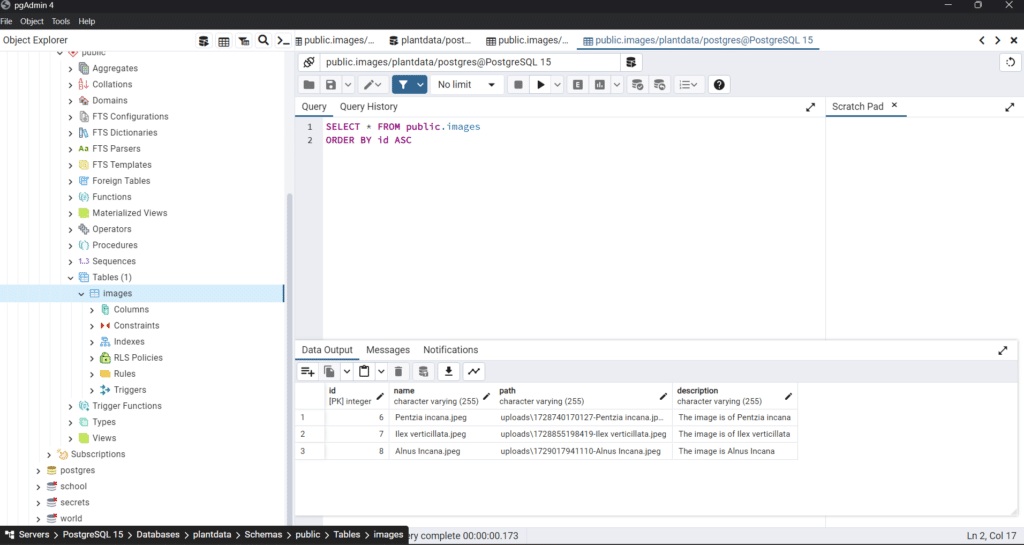
PostgreSQL database
Step 7 : Open the Homepage and click on Identify Image to select the image from the folder
Step 8 : Select any plant Image from the plant folder
Upload the Plant Image
Step 9 : Click on the Check button to retrive the name of the plant

Name of the plant Image
Leave a Reply