How to Lock cells in OpenPyXL Python
 By Isha Bansal
Hey fellow Python coder! In this tutorial, we will learn how to Lock cells in Python using the OpenPyXL library. We will start with some basic concepts of OpenPyXL, then move on to understanding what cell locking is and how it benefits the users. Lastly, we will learn how to implement the same using Python programming.
Let’s get started!
Introduction to OpenPyXL & Cell Locking
OpenPyXL is a popular Python library that helps work with Excel files. It comes with various functions and sub-libraries which makes it easy to interact with Excel sheets and operate on them.
In this tutorial, we will be looking into Cell Locking which is a feature in MsExcel that allows the user to control the access of data present in a workbook.
But why is this helpful? Let’s assume you are sharing some data that you don’t want anyone to play around with or manipulate. In such a scenario, Cell Locking is the go-to option which will help you lock the file before sharing and no one can modify it unless they have a password to unlock the file.
Next, let’s move on to the code implementation of Cell Locking. Before diving in, make sure you have OpenPyXL installed. You can install it using the following command: pip install openpyxl.
Code Implementation of Cell Locking in OpenPyXL
In this section, we will understand cell locking in a more practical way by following a few steps. I have mentioned the steps below:
- Creating a Simple Workbook (manually)
- Loading the Workbook into our code
- Locking one or a few cells in the Workbook
- Adding password protection to sheets
Creating a Simple Workbook (manually)
I took the help of some random internet sources, created an Excel file with manual effort, and saved the data in my system. I have added the screen snip of the data that I have below. You can create any data that you wish to work on based on your preferences.
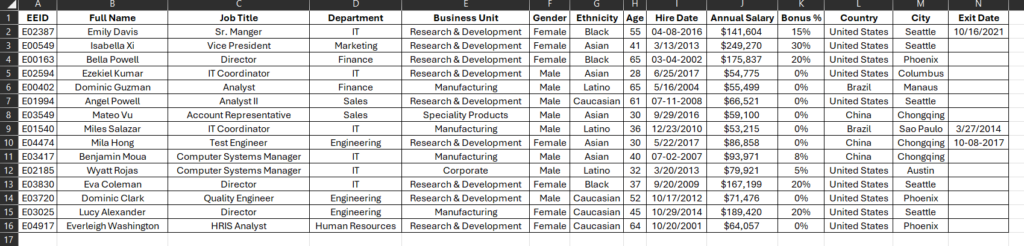
Please note I have saved the file with the name as Sample_Data.xlsx.
Loading the Workbook into our code using OpenPyXL
Let’s understand how we can load a workbook into our code with the help of openPyXL. First of all, we imported the library and then loaded the workbook using the load_workbook function. We will pass the file name (considering the file is saved in the same location as the code file) as the parameter. Have a look at the code snippet below. Along with this, we will also load the first sheet of the workbook where the data is present in our case the name of the first sheet is Sheet1.
import openpyxl
workbook = openpyxl.load_workbook('Sample_Data.xlsx')
sheet = workbook['Sheet1']
Locking one or a few cells in the Workbook
Let’s try and lock the Employee IDs as they need to be preserved for an organization. We will start by locking one single cell (the first cell with Employee ID) i.e. A2. For locking the cells, we will make use of the Protection function present inside openpyxl.
Locking a Single Cell
We will import the Protection function from the openpyxl library and then choose the cell we wish to lock (in this case we are locking A2). The next thing we do is change the protection property of the cell using the Protection function and setting the locked parameter as True . Finally, we save the modified workbook.
from openpyxl.styles import Protection
cell2Lock = sheet['A2']
cell2Lock.protection = Protection(locked = True)

workbook.save('Single_Cell_Lock.xlsx')
When we open the workbook, you must have noticed that you can still modify the value and they aren’t locked. Please note that Locking just a single cell in Excel does not prevent someone from opening the file and editing the locked cell. This is to give you a basic understanding of cell locking.
Locking Multiple Cells
Let’s also understand the concept of protecting multiple cells using the Protection function just like done in the code below.
import openpyxl

workbook = openpyxl.load_workbook('Sample_Data.xlsx')

sheet = workbook['Sheet1']

from openpyxl.styles import Protection

for row in sheet.iter_rows(min_row=1, max_row=16, min_col=1, max_col=2):
    for cell in row:
        cell.protection = Protection(locked=True)

workbook.save('Multiple_Cell_Lock.xlsx')
In the code, we have loaded the workbook and got the active sheet in a similar way as before. But instead of protecting a single cell, we are protecting multiple cells here by making use of the iter_row function that takes the range of rows and columns that need to be selected. For each cell in every row, we will add the protection parameter and set locked property as True. In this case, we are locking the Employee IDs and the Names of the Employees hence the range of rows is from 2 to 16 and the range of columns is from 1 to 2. Finally, we save the workbook using the save function.
Even in this case, when you open the saved Excel file you can manipulate the data. The reason is the same as in Excel protecting just a couple of cells can’t add protection to the whole file. Let’s modify that using the sheet protection as shown in the code snippet below. The protection.sheetfunction modifies the protection property of the entire sheet and in this case, we will set it to True to see if protection is applied.
import openpyxl
workbook = openpyxl.load_workbook('Sample_Data.xlsx')
sheet = workbook['Sheet1']

sheet.protection.sheet = True

workbook.save('Sheet_Protection.xlsx')
A unique thing happens when you open this sheet in your system and try to modify the data. The moment you do that, a popup appears on the screen stating that the sheet is in a protected state and can’t be modified. Have a look at the output below.

You might have also noticed that it’s saying it requires a password which in this case we can’t enter as it is not set or mentioned anywhere in the code. In the next section, we will add the same to the workbook.
Add password protection to Sheet using OpenPyXL – Python
To set the password attached to the protected sheet we will make use of the protection.password property and set any password as the value. To keep it simple, I am gonna keep the password simply as “1234” and to enable password protection we will make use of the enable function. Have a look at the code below.
fuimport openpyxl
workbook = openpyxl.load_workbook('Sample_Data.xlsx')
sheet = workbook['Sheet1']

sheet.protection.password = '1234'
sheet.protection.enable()

workbook.save('Password_Protected_Sheet.xlsx')
Now when you open the saved workbook and try to modify the data, the initial output is the same as shown in the previous section. But in this case, let’s navigate to the REVIEW tab and unprotected the file. The moment you click on that you will be asked to enter a password just as shown below.

Just enter the password (in our case it’s 1234) and press OK. Now if you will notice you are all set to modify the data the way you wish to. And if you share this file with any user who is unaware of the password then that user won’t be able to modify any cell in the data.
Also Read:
- Insert a row in a specific position into Excel using OpenPyXL in Python
- Customize chart setting using OpenPyXL in Python
- Change the font color of Excel cells using OpenPyXL in Python
Happy Coding!
Leave a Reply