How to draw a border around a view in SwiftUI
 By Samim
In this tutorial, we will see how to draw a border around a view in SwiftUI.
In SwiftUI, there is a special modifier called the border() modifier that helps us create borders around our views. It is like picking the style of our frame, depending on what we want. We can choose to make our frame thicker or give it rounded corners.
Adding a Simple Border
Adding a simple border around something, like a text view, it’s really easy. We just have to pick the color we want for the border, and that’s pretty much it. It is like choosing the color of a frame for a picture.
Example
We can make a border by choosing a color and passing that color into the border() modifier like below.
Text("CodeSpeedy")
    .border(.mint)
Output:

Making Some Space
As we can see in the above output, there is no space between the border and the text view. That means the border is really close to the text inside it. But usually, we want a little space between them. To make that space, we can add some padding.
Example
Add some space by using the padding() modifier.
Text("CodeSpeedy")
    .padding()
    .border(.mint)
Output:

Changing the Border’s Thickness
By default, the border is 1 point thick. If we want it thicker or thinner, we just have to specify the width.
Example
We can specify the width (with a specified value) as a parameter in the border() modifier to make the border thicker or thinner.
Text("CodeSpeedy")
    .padding()
    .border(.mint, width: 5)
Output:

Rounded Borders
Sometimes, we want rounded borders, but the regular border modifier can not do it. In this case, we can use a special modifier called overlay() and a RoundedRectangle() shape to make our borders rounded.
Example
Now, have a look at the example below to make a rounded border.
Text("CodeSpeedy")
    .padding()
    .overlay(
        RoundedRectangle(cornerRadius: 10)
            .stroke(.mint)
    )
In the above program, the RoundedRectangle(cornerRadius: 10) will create a shape with rounded corners. The number 10 represents how much the corners are rounded.
Then, the .stroke(.mint) will set the border’s color to mint.
Output:

Customizing Rounded Borders
We can also change the thickness of our rounded border by using the lineWidth parameter with a specific value into the stroke() modifier.
Example
Text("CodeSpeedy")
    .padding()
    .overlay(
        RoundedRectangle(cornerRadius: 10)
            .stroke(.mint, lineWidth: 5)
    )
Output:

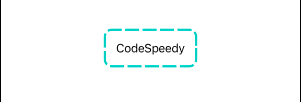
Creating Dotted Border
We can even make our borders look dotted. Instead of specifying the lineWidth in the stroke() modifier, we can use the style argument to control the pattern of our dotted line.
Example
Create a dotted rounded rectangle border.
Text("CodeSpeedy")
    .padding()
    .overlay(
        RoundedRectangle(cornerRadius: 10)
            .stroke(.mint, style: StrokeStyle(lineWidth: 3, dash: [20, 5]))
    )
In the above program, the style: StrokeStyle(lineWidth: 3, dash: [20, 5]) will create a 3 points wide border, and the border will appear as a series of short dashes (20 points long) with gaps (5 points) in between.
Output:
Leave a Reply